Monday 30 June 2014

Nail Art Challenge June - Destinations

During the month of June I decided to take part in two nail art challenges. To view my other posts click here! Doing two challenges has been a little much, but I'm slowly going through them... Day 28 of #nailartjun was Destinations. As you may know I have traveled up the East Coast of Australia throughout May and it was amazing! One of my favourite places was Sydney (amongst many others). I felt right at home in Sydney and my boyfriend and I walked the Harbour Bridge. When I saw this design by @sparklicious_nails I know I had to recreate it. This is the Opera House and the Harbour Bridge in Sydney. I actually took a photo of this view during the day. 


I started off with a white base, of course OPI Alpine Snow. When that fully dried I taped up the tips of my nails and used a sponge to create an ombre. I used Nails Inc Notting Hill Carnival (yellow), Nails Inc You're A Peach (orange) and OPI Kiss Me On My Tulips (pink) for the ombre on my index finger. I then used the above 3 colours as well as Mecca Cosmetica Timandra (purple/pink) as on ombre on my middle finger. I used a new part of the sponge and used Nails In You're A Peach, OPI Kiss Me On My Tulips, Mecca Cosmetica Timandra and Kester Black Bougainvillea (purple) for the gradient on my ring finger. I used Mecca Cosmetica Timandra and Kester Black Bougainvillea for the ombre on my pinky. 

I then removed the tape and create a horizontal gradient on the bottom bits. On my index finger only sponged on Kiss Me On My Tulips. On my middle finger I used Mecca Cosmetica Timandra and Kester Black Bougainvillea, On my ring finger and pinky I used Kester Black Bougainvillea and Mecca Cosmetica Cobalt. 

I then slowly started to draw using my Barry M Nail Art Pen in black. I started off drawing a line between the two gradients. After that I outlined the shape of the opera house and coloured it in and drew a line at the end of my pinky. I then applied some of the nail art pen product onto a note card and used my extremely thin nail art brush (that I thinned myself) to draw the Harbour Bridge. I started with the bottom line, then the first arch and then the second. I drew the zigzag line inside the arch and then drew the straight lines down. It was pretty tricky and needed a lot of patience and concentration, but I'm so happy with it! 

After waiting for about an hour I applied my top coat. I wanted to ensure that the design was fully dry before I do anything! 

The ombre looks so beautiful and it's the best sunset look I've ever created. It's also the most incredibly "scenery" or 4 finger nail art I've created. I'm so proud. Thank you to @sparklicious_nails for the design idea! What I love most about it is that I've seen that view in real life, and also that I walked over that bridge! 

What do you think of these nails?
xx Elaine 

Nail Art Challenge June - Picnic & Tropical & Summer

During the month of June I decided to take part in two nail art challenges. To view my other posts click here! Taking on two challenges might have been a bit too hopeful, because I'm drastically behind! As you can tell I'm trying my best to try and get them all done.... today...... So I'm a little more up to date with the challenges on Instagram, but like I mentioned in my previous post: It's about the nail art, who cares if it's a little late.. right?!

Today I am combining three different themes: Picnic and Tropical from #nailartjun and Summer from #nailartchallengejune. At the start of the month I was looking through all the themes and immediately wanted to recreate this manicure by @littletipoff and @sprangleynails on Instagram. I have seen this design floating around instagram and pinterest for a while, but I mainly looked at these two ladies.

It's a Sex and the City style picnic with tropical cocktails and how could this not resemble summer?! I have recently started rewatching Sex and the City from the start... again... and I love it! This is probably the only show I can watch and rewatch and rewatch. I used a ton of nail polishes. Each cocktail is made out of two colours.

I started off with a white base, of course OPI Alpine Snow. I used Furless Cosmetics Clouded and the bottom of the two brushes to draw the cocktail glasses. I love that grey and for a full review click here! I then used China Glaze Grass Is Lime Greener and Essie First Timer and slightly mixed them together using the thicker brush on the top. For the second cocktail I used Cotton On Body Candy Floss and Essie Camera. I love the Cotton On Body nail polish, it only cost $2.95 and it extremely opaque and neon. Camera by Essie is also a neon but requires a white base as it's a jelly formula. For the third cocktail I used Kester Black Blueberry Tart and Now, part of the Architecture in Helsinki limited edition due. And finally for the last cocktail I used Kester Black Peach Melba and Models Own Beach Bag.

I used Black Satin by Ulta3 for the straws and Mecca Cosmetica Ophelia for the cherries. Lastly I used Barry M Diamond Glitter for the glitter ice cubes. That's a lot!! Each cocktail had a bright pastel and a neon so the colours really popped.

I think these nails look really cute, what do you think?
xx Elaine

Nail Art Challenge June - Fathers Day & Recreation

During the month of June I decided to take part in two nail art challenges. To view my other posts click here! Taking on two challenges might have been a bit too hopeful, because I'm drastically behind! Anyway, I decided to combine two different challenges: Fathers Day - day 15 of #nailartjun - and Recreation - day 16 of #nailartchallengejune. Way back when I first started instagram I created a Delfts Blauw design inspired by The Polish Perfectionist. Delfts Blauw (Delft is a place and Blauw is Blue) is a traditional white and blue pottery made in The Netherlands and usually has iconic Dutch drawings like windmills, clogs, tulips, a boy and a girl is traditional Dutch wear kissing.

I loved the pattern when I first saw it, but didn't really have the right tools to recreate The Polish Perfectionists' nails. Now I do! The "then" photo is the top left photo and taken about a year ago. I believe I used OPI My Boyfriend Scales Walls and a dark blue Sally Hansen Nail Art Pen. Although I quite like nail art pens, the tip of them is way too thick to do any kind of detailed drawings.

For the "now" I used OPI Alpine Snow, my favourite white as well as dark blue acrylic paint. I've never used acrylic paint before but I loved it! Polish thickens very quickly and it's hard to draw when it thickens. The acrylic paint stays wet for a longer amount of time so the drawings are much smoother.

So it easily fit in with recreation, but for Fathers day.... My dad used to fly a lot with KLM for his work and, I'm not sure if they still do it, but back then for every flight you could choose a little Dutch house (pictured above). We have tons of them now and they're all in my dads office! It's a bit of a stretch, I know, but it's about the nail art right?!

I'm so impressed with how these turned out, and it's such a huge difference between a year ago. I used a small detailing brush I bought on eBay. It was still too thick so I trimmed it down myself to the size I wanted it to be.. extremely thin.

Wednesday 25 June 2014

Glimmer By Erica - Twilight Sky

About a year ago I was introduced into the indie nail polish world. I bought a couple nail polishes from different indie nail polish brands including KB Shimmer, Lush Lacquer (which is now Polish Me Silly) and Glimmer by Erica. At the time I wasn't really much of a glitter bomb polish lover, but slowly I have started to get into glitters more and more and decided to try them out again. I started off with the beautiful Twilight Sky by Glimmer by Erica. It's so much better than I remembered! It's packed with small metallic hexagonal glitters in orange, hot pink, blue and light pink. It also includes larger metallic hexagonal glitters in cyan blue, royal blue and purple. It's such a beautiful colour combination and that's why I bought it in the first place!

I created a glitter gradient over OPI Steady As She Rose. It's a gorgeous pink nude that really makes the glitter pop. I started off mattifying it for two reasons. The first is because mattifying the glitter loses its metallic shine so the colours become more apparent in the photos. The second reason is a tip thanks to @gingerelfie on Instagram. I was having a problem with glitters that I need to add 3 coats of Seche Vite top coat to smooth it out, she told me that if you add a matte top coat first and then apply a shiny top coat you shouldn't need as many! This definitely worked and I only needed one coat of shiny top coat to smooth it out!

The photo to the left is a macro shot of the glitter gradient. Since it's mattified you can really see the different colours. It's so beautiful!!

To create the gradient I used a sponge - mine are the cheapest from Primark, they work great! - and added one line of glitter, then dabbed it onto my nail focussing at the top and then slowly making my way down.

I then added my Seche Vite top coat. It's so beautiful glossy! The colour in real life is obviously the same as the mattified photos, but the colours don't look as vibrant in the photos. It looks like an elegant party on your nails!

I'm so impressed with this glitter polish, especially because I'm still not the biggest glitter fan. I literally don't want to take it off!! I've had the bottle for a year and the glitter hadn't settled whatsoever. Before using it I put the bottle upside down for a bit and I didn't have any problems fishing for larger pieces.

I don't know too much about the indie world, but this is a super unique glitter combination as far as I know...!

You can find her Facebook page here and her Etsy here!


What do you think of Twilight Sky? Will you be picking it up? Do you have any indie nail polish suggestions?

xx Elaine

Monday 23 June 2014

Hema London Haul & Swatches

Hema is a Dutch retail giant that has finally made its way to London! I'm Dutch and whenever I'm back in The Netherlands I visit Hema. It's a store that sells anything from food, office supplies, home decor, kitchen utensils .... pretty much everything really... and of course beauty products! I have tried Hema nail polishes before from a swap I did with a friend in Holland and I really liked everything about them. Now I finally have the change to buy my own!

Hema is an incredibly cheap store, and some have compared it to either Wilkinsons or Poundland. You can buy bags of liquorice for only £1, nail polishes from £2.50, but of course there are also some more expensive things like a set of 2 tea towels is £6. I will be reviewing my 6 nail polishes. The nail polishes start from £2.50, but for different finishes the price can go up. I believe the holographic nail polishes cost £3.75.

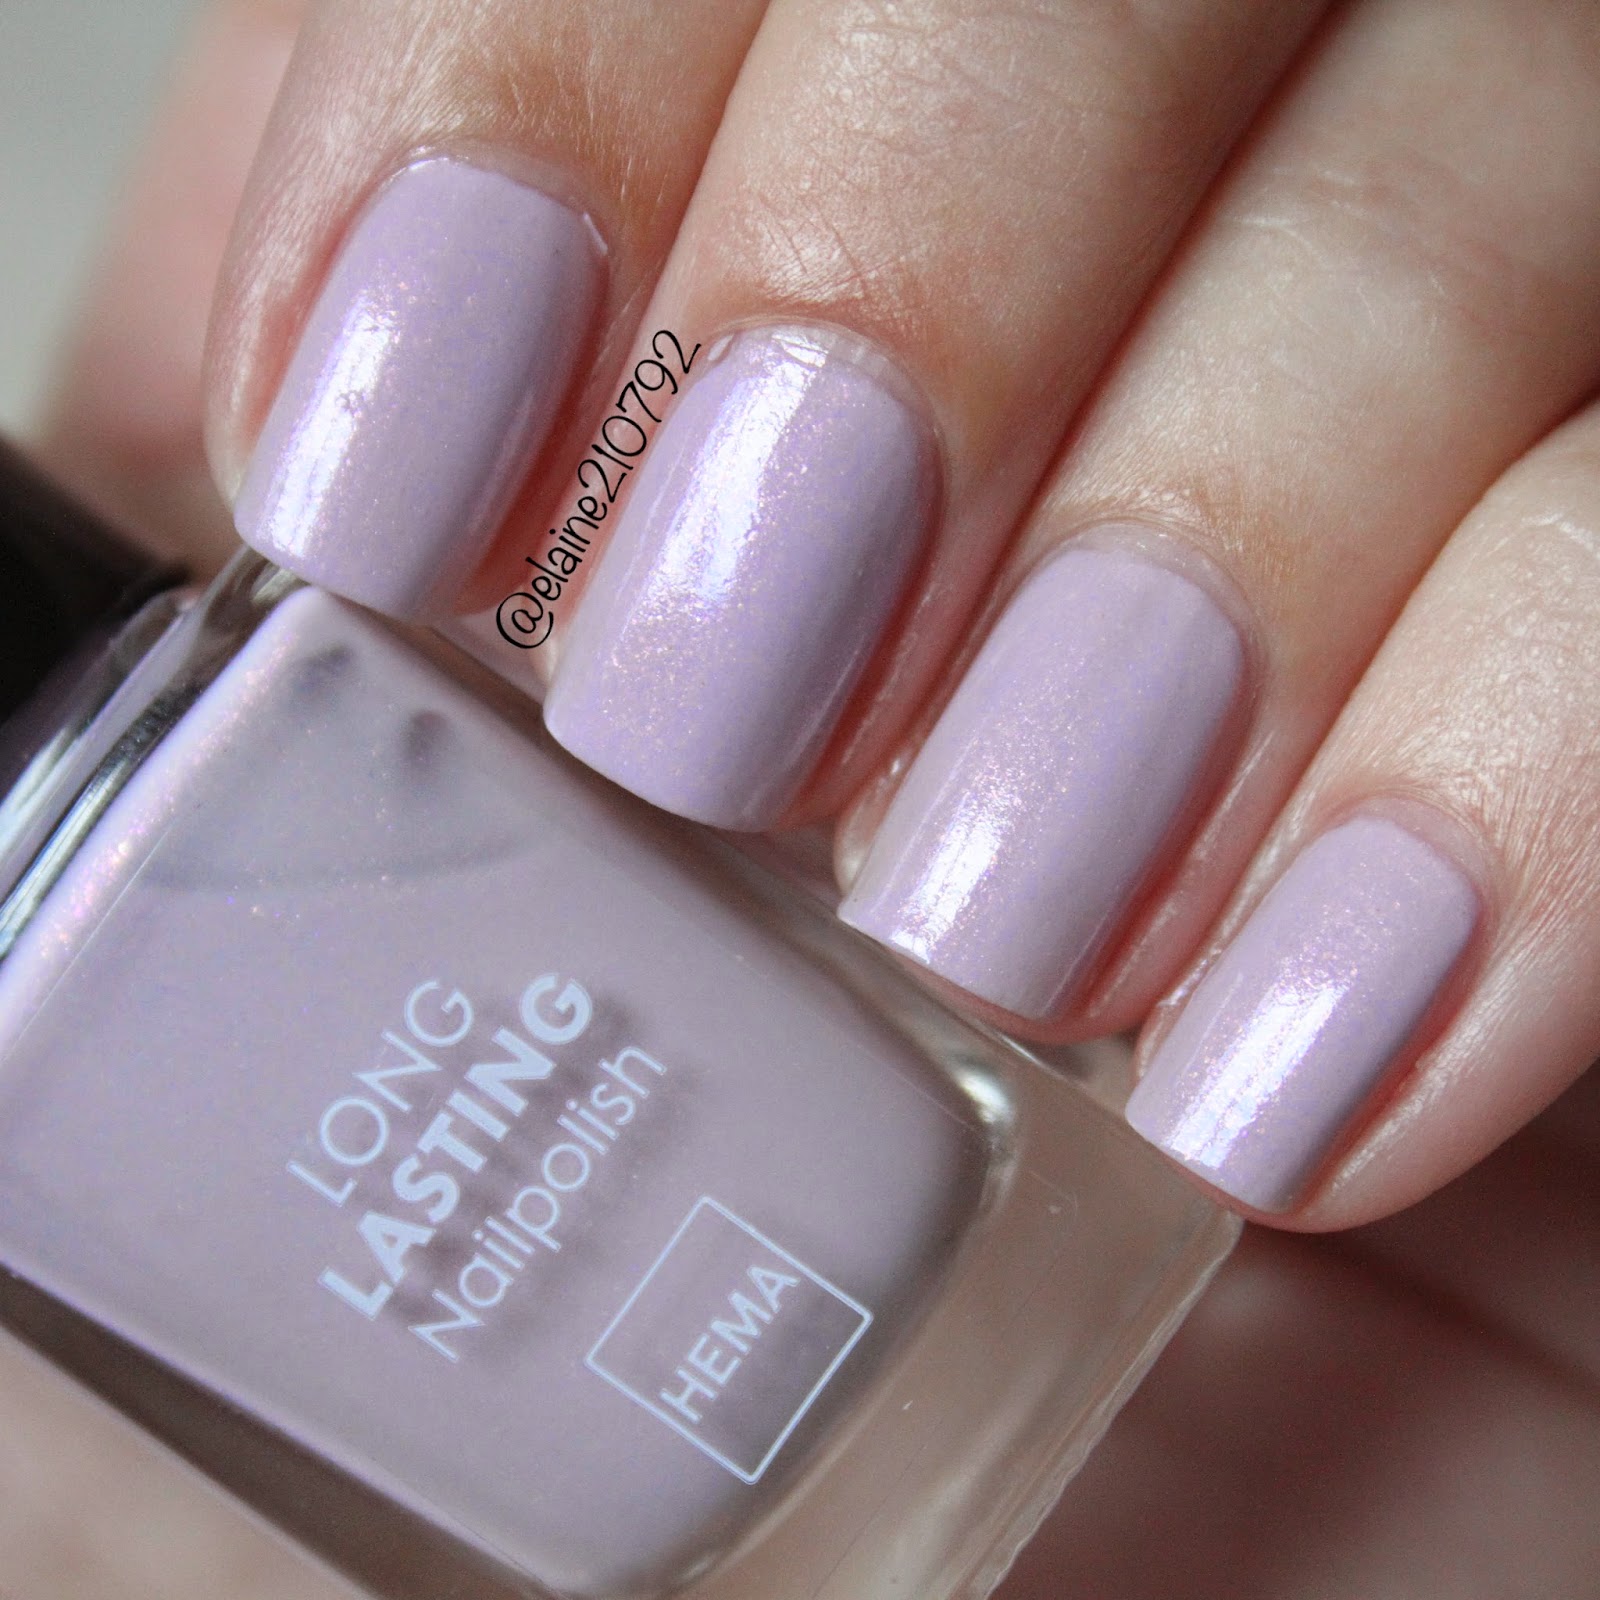
First up is a beautiful pale purple lilac colour with hot pink flakie shimmery glitters. The nail polishes don't have names on the bottles but they can be found online. This is number 831 called Irish Lavender. I love light purple colours but am not usually a huge fan of shimmer but this just looked so beautiful! I said it's a flakie shimmer because it's all different sizes and you can see from the macro shot below. The shimmer is very visible in real life and even more visible in the sun.

The formula is a little sheer and I used three coats for the swatch. Both photos are taken in the shade.


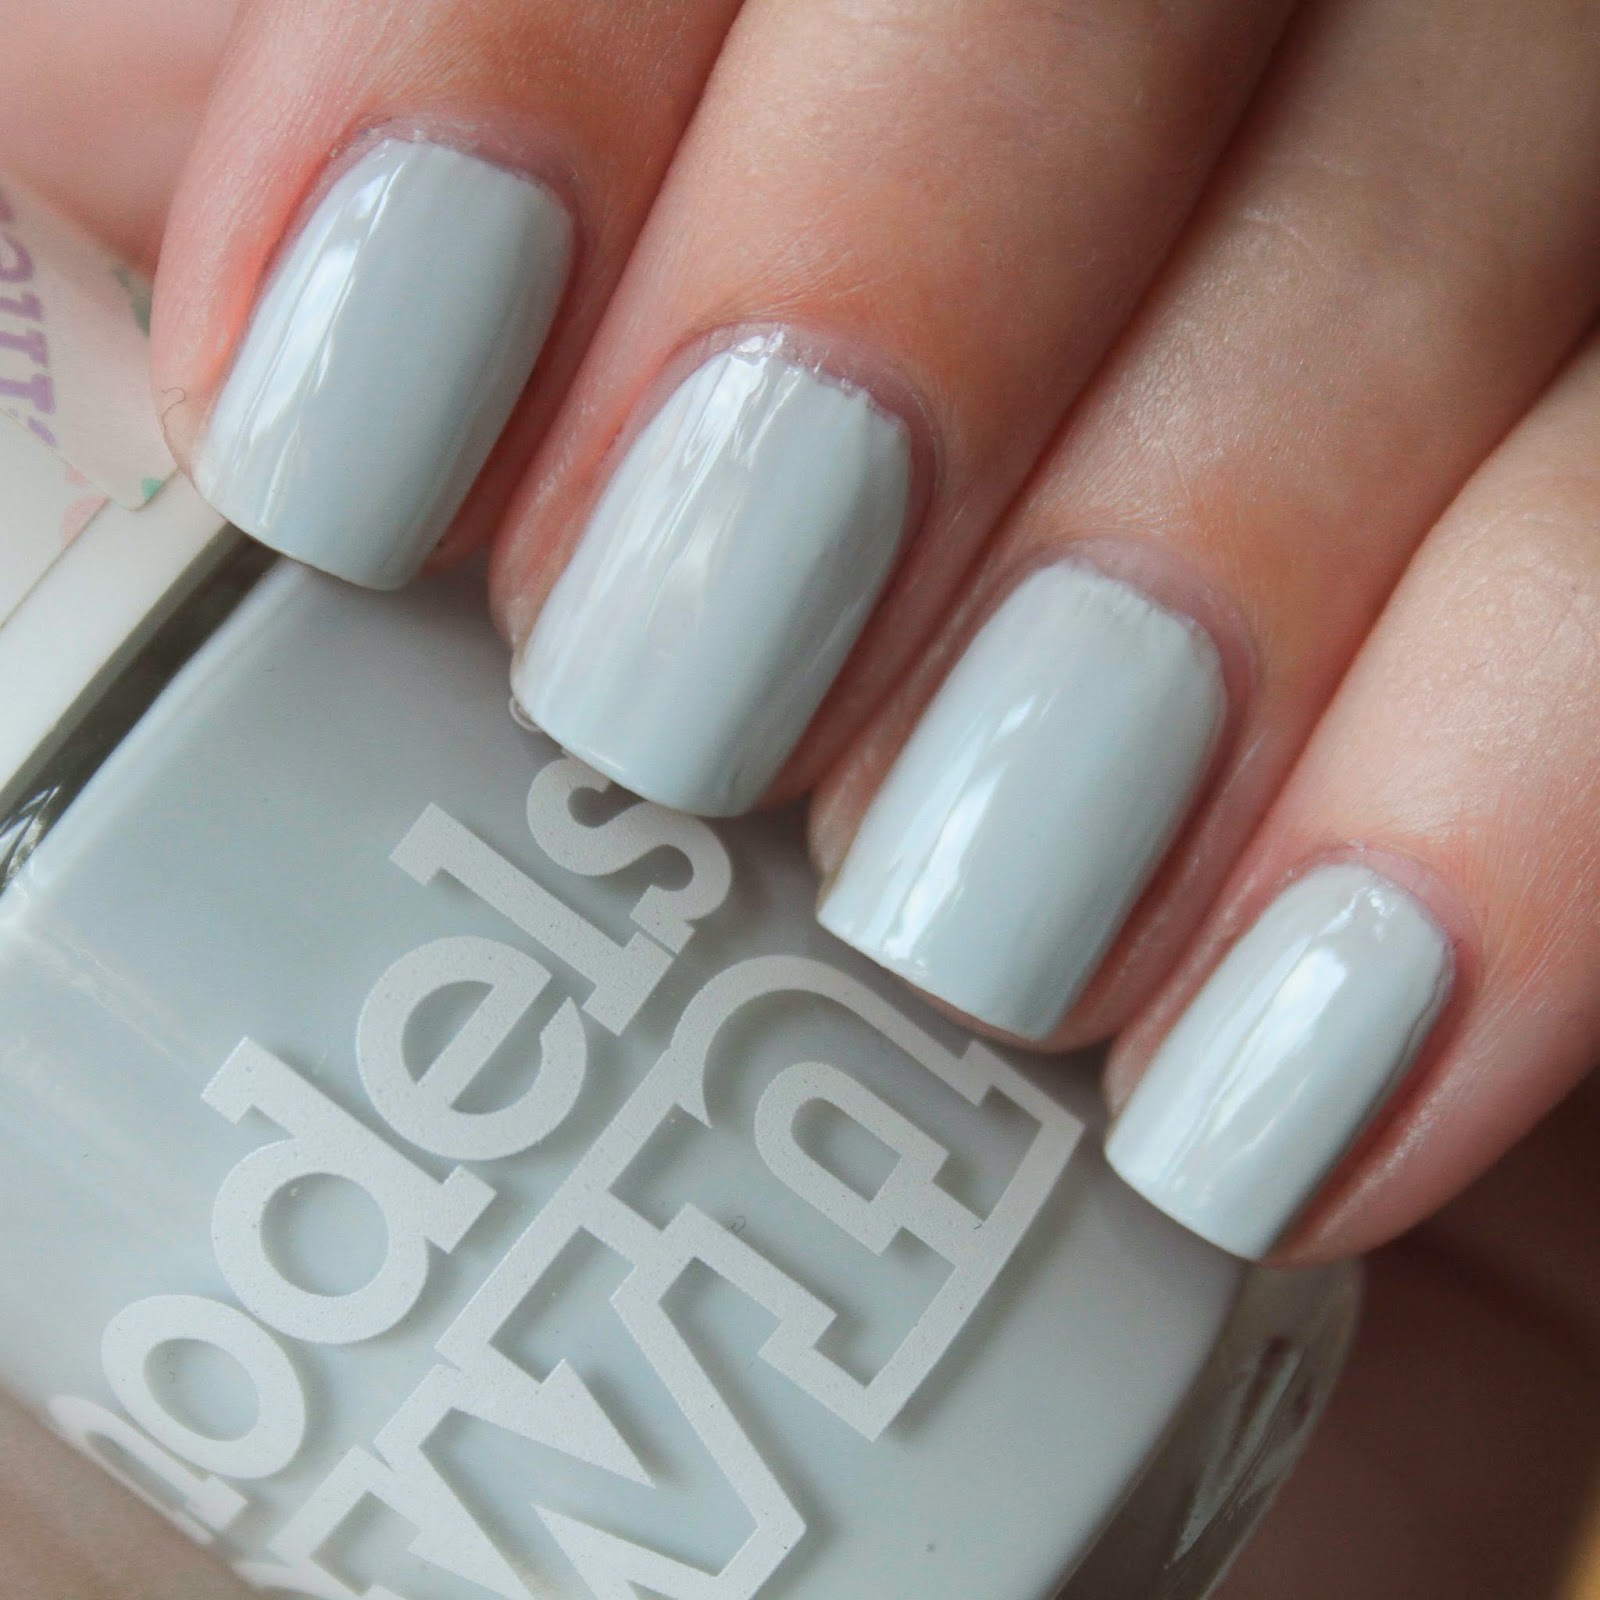
The second colour is number 846 called pastel grey. It is a beautiful pastel grey... figures! It also has very very subtle silver shimmer which you can only really see in the sunlight. It's a gorgeous colour on its own, I've recently really started to fall in love with greys! But the shimmer makes it incredibly unique. Unlike the shimmer in the above polish, this is very fine and all the same size as shown in the photo below.

The formula was much more opaque on this one and I applied two coats for the swatch. Both photos are taken in the shade.


The third nail polish is a colour I thought I'd NEVER go for. This is 802 Fuchsia a bright hot pink packed with shimmer making it a bit pearly. I don't like pearl or frost finishes, but for some reason this really intrigued me. Luckily Hema has testers in the store so I was able to try it before buying it and there was just something amazing about it. After doing a full swatch I'm happy I bought it.

I applied two coats for the swatch. Although it looks like you can see brush strokes, in real life it's all even and not brush stroke-y. Both photos are taken in the shade.


The final two polishes are both holographic and they are.... AMAZING. That's the second time I've used full on caps. That's how excited I am about these polishes. This is number 52 Holographic Copper. I've been looking for a nude holographic colour and this is just beautiful. My middle finger nail is quite ridged, so that's my nail not the polish! Anyway this is just the most holographic polish I've ever used. I'll let the photos do the talking.

I used two coats for the swatch. The first two photos are in the sun, the third in the shade and the macro in the sun.

Look at that holo!! This is unedited!!

Even in the shade you can see the holo goodness.


The last polish is .. just... ah... I don't even know where to begin. It's beautiful. This is 54 Holographic Pink. This is another colour I've wanted for ages and I was going to buy the colour club one but I'm so happy I picked this up instead. It's so amazing and SO holographic!!

I used two coats for the swatch. The first 2 photos are in the sun, the third and the macro are taken in the shade.

I thought the previous colour was intensely holographic, until I tried this one! Again it's unedited in the sun. Beautiful.

The holographic in the shade.


I'm so impressed with the nail polishes from Hema. They're so cheap but incredible quality. These colours are all very unique in my collection. They also have a lot of creme finishes without the shimmer and glitter top coats.

Tomorrow the new Kingston store opens and I can't wait! It's supposed to be much larger than the one at Victoria Station. Luckily it's a very cheap store because I have a feeling I'll go a bit crazy in the liquorice and nail polish sections...

Have you tried any of the Hema polishes? Which ones would you recommend?

xx Elaine

Sunday 22 June 2014

Models Own Scented Polishes

The two UK brands that I missed most while being in Australia were Barry M and Models Own, needless to say, when I arrived back in the UK those are the first nail polishes I purchased. I fell in love with the Models Own scented polishes about a year ago. I bought Blueberry Muffin and Apple Pie from the Models Own Bottle Shop in Westfield last year and have been using both of them like crazy. I'd say Blueberry Muffin is in the top 10 nail polishes I've used the most.

Since being back I added Strawberry Tart, Grape Juice, Peach Melba and Coconut Cream to my collection. I literally cannot pick a favourite from the collection. Don't they all just look so beautiful together? This is probably my ideal collection, something full of pastels is my ultimate weakness.

I'll start off with my very much loved Blueberry Tart. This is a very light grey toned baby blue. The very apparent grey tone in this polish makes it unique amongst other baby blues.

The polish is a little thick which made it a bit tricky to work with in the beginning. Once you get the hang of it it's pretty good. It's a streaky polish so you do need three coats to even everything out. It's definitely worth it though, the colour is beautiful. And the smell..... It smells super sweet, but it isn't annoying. I usually just forget about it until I move my hair out of my face and get a whiff of it. Amazing. Even with a top coat, you can still smell the sweetness of the polish.

The second nail polish is Apple Pie. Who could not buy a nail polish that smells like Apples!? Again it's a very sweet but crispy apple scent. The colour is a gorgeous mint green, it's more green than blue which I prefer in a mint polish. The formula was similar to Blueberry Tart but not quite as thick. It was easier to apply but was still a bit streaky. I applied three coats for the swatch.

The third colour is Strawberry Tart. This colour really surprised me. I'm a huge fan of pale pinks but this is very different from any other pale pink and I was surprised at how pretty it looked! It's a much more peach toned pink and is a lot more wearable. The formula was a good consistency and I needed three coats to even out the streakiness. It smells like super sweet strawberries. Amazing.

The fourth colour is Grape Juice. I'm not the biggest fan of grape scents or sweets, but the colour is this is beautiful. Purples are my most loved colours. Again it's very different from other pastel purples as this has much more of a warm tone.

The application on this was the easiest. It's the least streaky and I could definitely get away with just 2 coats. I used three for the swatch so all the swatches are identical.

The next two colours are brand new and I think they've come out for summer. This first one is called Peach Melba and it's a gorgeous pale orange. Again it smells super sweet! The application is similar to the others where it's a bit streaky and needed three coats. The formula is a little thinner which makes it easier to apply.

The final colour is Coconut Cream. I am just so obsessed with these creamy whites! I can't get enough of them!! This is such an amazing off white shade, it's much more wearable than a plain white. The application was the same as the others, it needed three coats as it was pretty streaky. The end result for all of them is beautiful though. This polish smells of very sweet coconuts, I love it!!

There is one more yellow scented polish that smells of bananas but I don't own that colour.

I love all of these colours, they're so beautiful and surprisingly unique for being a pastel collection. All of them apart from Grape Juice needed three coats as they are pretty streaky, but it's definitely worth it.

Saturday 21 June 2014

Barry M Gelly Summer 2014 Swatches

I picked up a few of the new Barry M nail polishes for summer 2014. Barry M came out with 7 new gelly polishes as well as 6 of the matte polishes. I am not a huge fan of matte nails, and I have a matte top coat so I didn't feel the need to get any of those, but I did pick up 5 of the gelly formula. I bought 4 of them together a little while ago when Boots had a 2 for £7 offer (they're normally £3.99 each), and I picked up the final one a couple days ago with one of the four limited addition polishes at Boots and Superdrug.

First up is Damson, I've already blogged about that before in my Sally Hansen Pacific Blue Dupe post. Damson is a beautiful muted cobalt blue, it's a very unique colour as it's very bright, but still slightly more greyed out compared to other blues. Check out the before mentioned post to see blue comparisons.

The formula on this is amazing, it's very creamy and opaque. I used two easy coats for the swatch. It dried super glossy, like all Gelly Hi-Shine Nail Paints by Barry M.

Next up is Elderberry, this is another very greyed out light blue. Although it's a very light blue, it's still much darker than baby blues. The only colour that I have that's slightly similar is Nails Inc Sheraton Street. It's the same greyed out blue, but that one has a hint more green. Elderberry is a really unique colour, and not something I have seen a lot of before.

The formula was really nice, the first coat was a bit streaky, but the second coat easily covered that up. Just remember to let these gelly nail polishes fully dry before adding another coat as they can start to drag. Again it dries to a beautiful glossy finish.

The third colour is Coconut. I am literally so in love with this colour! I have used this the most out of all my nail polishes since I've been back in the UK. I keep reaching for it, to wear it on its own or together with nail art. It's so good!! Anyway it's an off white creamy colour. I think it's a lot more flattering than a full on white. I only have one colour that's similar to this and that's Models Own Coconut Cream which also came out recently.

The formula is a little more tricky compared to most gellys from Barry M. It's very streaky and definitely needed three coats to get it streak free. It's a very opaque polish and once you put the third coat on it's like magic.

The fourth nail polish is Almond. This is a light taupe colour. I really like taupe colours but for some reason this didn't really work for me. It's a really nice colour though and I'll need to try it again when I'm not swatching. This is quite similar to OPI's Taupeless Beach but that's slightly more grey. Another similar colour is Nails Inc Porchester Square which looks slightly more grey. Not much of a difference though.

The formula on this was amazing, it's very smooth and not streaky at all. I used two coats to get it fully opaque.

The last colour I picked up is Pink Punch, a bright hot pink. It's a really nice colour but not that unique. It's very similar to Nails Inc Shoreditch, but that's slightly darker and a hint more red. It's also similar to Plush Pink from Leighton Denny (free with Harpers Bazaar this month) and OPI Kiss Me On My Tulips which are probably one drop darker.. pretty much identical.

The formula was again fantastic, this is why I love the gelly formula! I used two coats for the swatch but it's very opaque and creamy so with careful application you could probably get away with just one coat.


The other two colours I didn't pick up are Olive and Kiwi. Kiwi is a jade green, I love greens but don't really wear them too often. Olive is a very unique olive green. It's a bit of an odd colour and not something I'd ever wear. The formula on both is great.

Friday 20 June 2014

Nail Art Challenge June - Fuzzy Coat

This month I wanted to get back into nail art and decided to take part in a nail art challenge. I actually couldn't choose which one so am taking part in two! To check out my other June nail art posts click here!

The theme for day 9 for #nailartchallengejune was Fuzzy Coat. I know I'm totally doing these out of order and on the wrong days, but I'm getting through them! I didn't own a fuzzy coat until a few days ago. They never really interested me and I've never been a fan of bar glitter anyway! I did some research on fuzzy coat nail art and found the cutest thing ever. I went out and bought Barry M Marshmallow especially for it. A bit excessive I know... but totally worth it.


I really like the colour combo of Marshmallow, it consists of white and light pink matte bar glitter.

I started off with a white base using Alpine Snow by OPI. This is the best white polish ever. When I first got it I wasn't too impressed, but it seems the longer I've had it for the better it gets. The photo below is one coat of Alpine Snow, it's super opaque and not too streaky either. It's just a quick photo from my phone so please excuse the super red fingers! Anyway, once the base dried I used OPI Lucky Lucky Lavender to draw the base of the fuzzy. I just used the nail polish brush to create a half circle on the tips of my nails. Once that dried I applied two coats of Barry M Marshmallow. I then used Ulta3 Black Satin and a large dotting too to create the eyes, and my Barry M black nail art pen to add the mouth. Finally I used a smaller dotting tool and Alpine Snow to add the white of the eyes.

I think this design is so cute! I found it on pinterest but unfortunately there wasn't any watermark and didn't redirect to the artists blog.