Showing posts with label china glaze. Show all posts

Friday, 11 September 2015

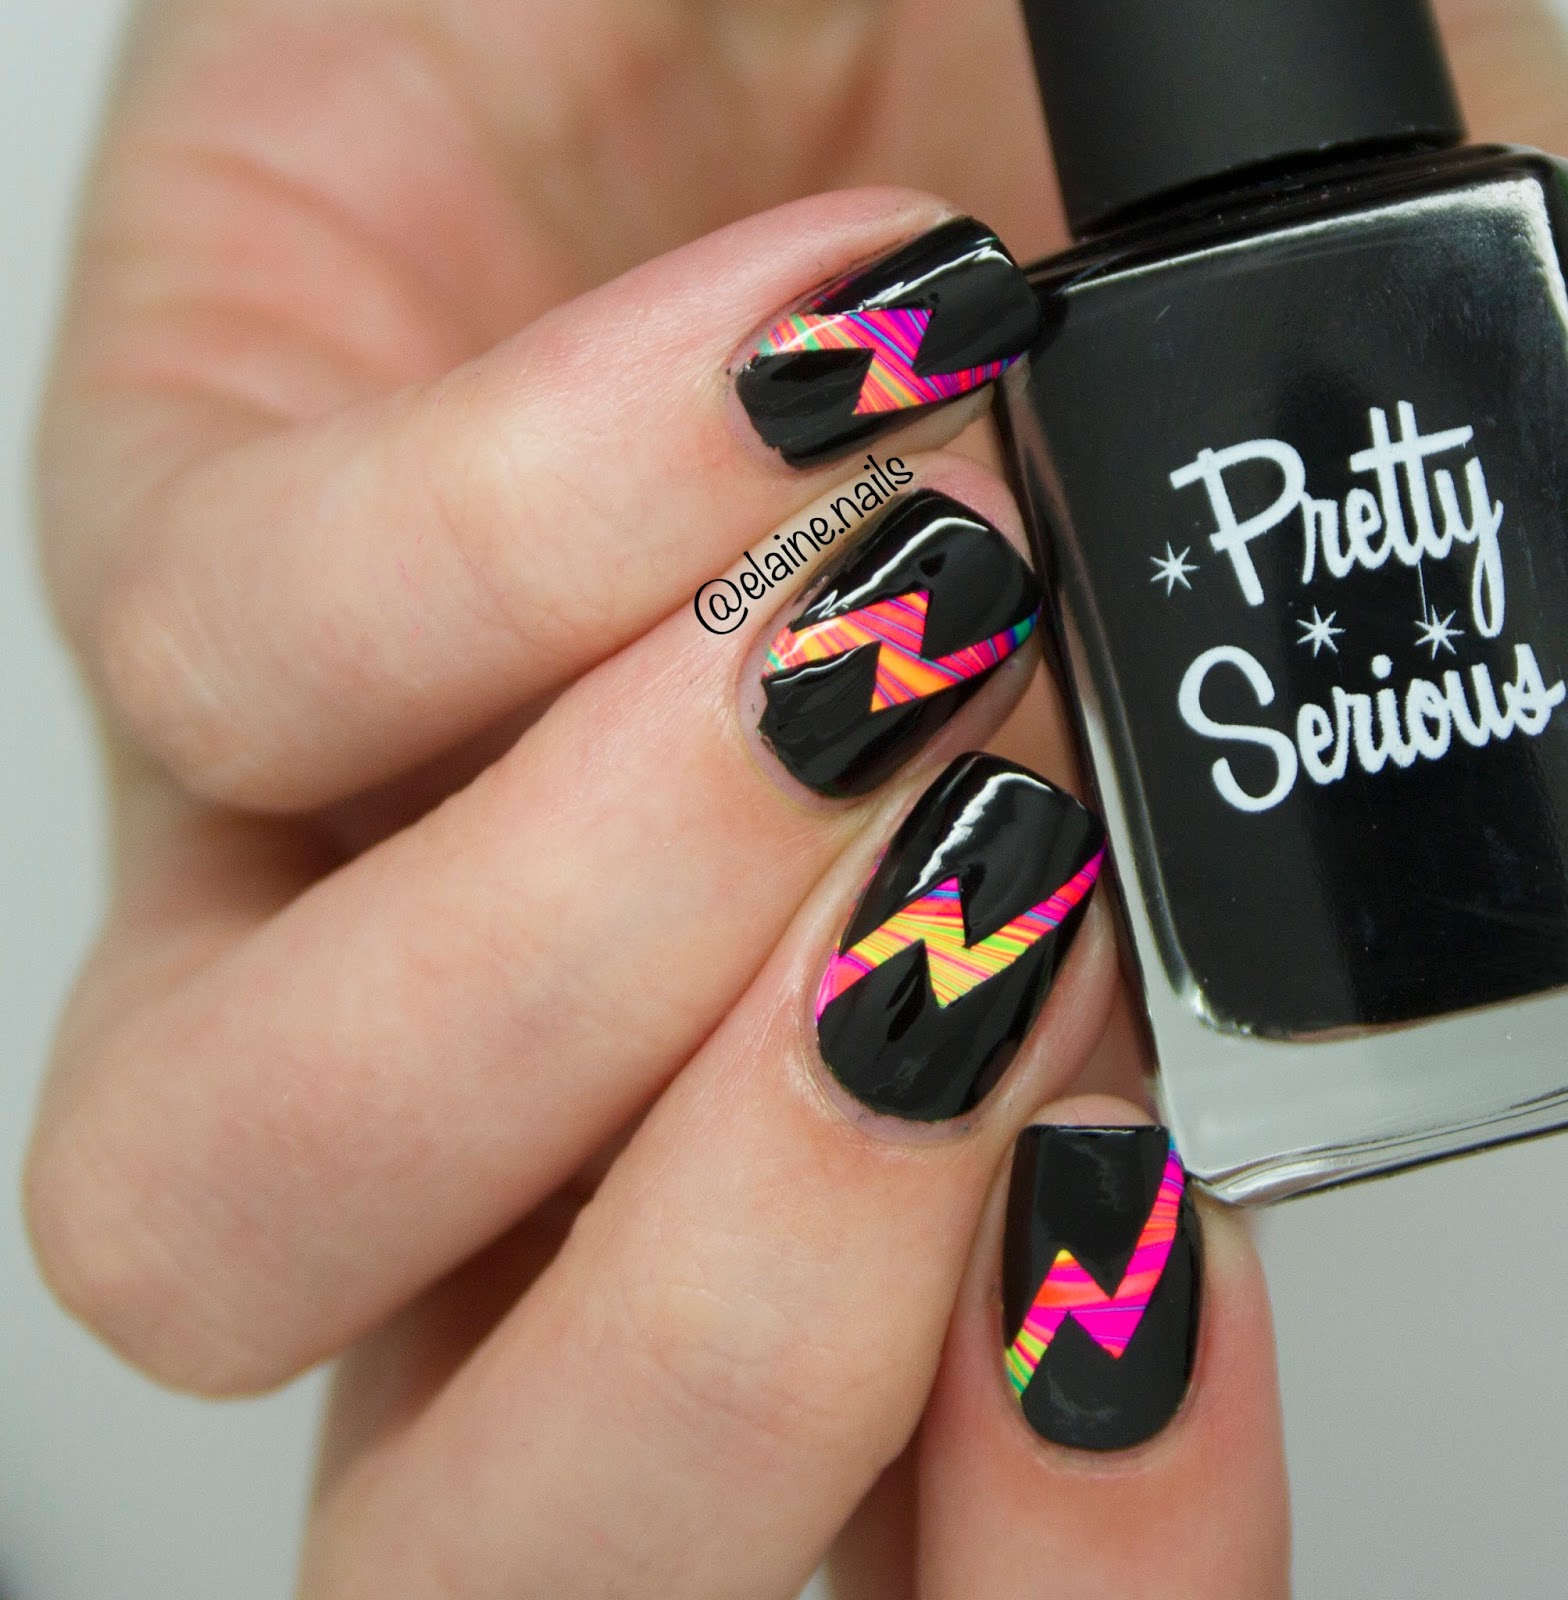
Rainbow Lighting Bolt Nail Art - Maniswap

Of course doing Bestie Twin Nails for every challenge this month isn't busy enough... I also had to do a mani swap with Leanne from @leasnails!

I love her account and she's just started her very own indie nail polishes called Charming Tale!

I decided to recreate her rainbow watermarble lightning bolt glitter nails and she did my mermaid nails! We even tried to copy each others nail poses... spoiler alert I LOVE her handpose and you might be seeing it pop up more often ;).

I have a video tutorial of these nails on my youTube channel!


I started off creating a watermarble design. Of course I used my Pipe Dream Polish A Night In Vegas collection polishes because that's the only thing I can successfully marble with.

In the video I show how I created this design. I add a drop in every colour twice and create the normal flower design. I then swirl from the top to the bottom to get this design. Does that make sense? Probably not...

Anyway I create the flower design first and then drag it back and forth because I feel like it mixes the colours better.

I applied a topcoat and waited for a good 15-20 minutes before moving on to the next step.. I wasn't taking any chances!

Next I added the lightning bolt stencils from Nail Mail.

I applied black nail polish over the top and while that was still wet I slowly removed the stencil following the shape of the design.

To top it all off and give it that extra sparkle I applied 1 coat of China Glaze Fairy Dust.

This is a very subtle glitter that dries completely flat (not gritty). It's very sparse and gives a magical effect that isn't too overpowering.

That's it!

Remember to check out my video tutorial here!

xx Elaine

Wednesday, 26 August 2015

Meebox UK Swatch & Review (and nail art!)

Hi everyone!
Today I have something else exciting to share with you! I feel like I start every post like this lately, but I am just honestly so excited with all the new launched here in the UK.

Meebox is the latest launch and it is a brand new monthly subscription service dedicated to all things nails! Meebox has just launched and this is their very first box. They were kind enough to send one to me for review. Meebox will feature the worlds most sought after polish and nail treatment brands and colours as well as the best independent polishes.

I have LIVE SWATCHES of this box on my YouTube channel!

Every month on the 1st Meebox will announce the theme. This month is California Dreaming'. Boxes are limited so you have to be quick! You can either do a one off payment of £20, or receive a discount for long term subscriptions. This way you'll be saving money and you'll never miss a box! The box will ship around the middle of the month with tracking!


Lets get started with the box! The second photo in the post is how I received the box, how cute!? And the third photo is what you see when you open the box. Meebox really took their time when creating this box and these details make a huge difference.

The reason I love subscription boxes is because it's like a little present every month.

Everything was wrapped up nicely so that nothing could break during transit.

The box contains 3 full size nail polishes, 1 mini almond cuticle oil, nail vinyls from What's Up Nail Art Store and 3 empty swatch sticks.

The theme this month was California Dreaming' and I think these colours are perfect, they're bright, vibrant neon colours perfect for hot summer days (if the english weather would cooperate....). The nail vinyls are shaped like palm trees!

First up is Models Own Turquoise Gloss.

This is a beautiful green toned turquoise. It's very vibrant and perfect for summer.

This is part of the hypergel line from Models Own, meaning it's glossy and long lasting like gel polish, but without the curing UV light.

The formula was great. I used 2 coats for the swatch.

The first coat was pretty streaky, but as it dried the streaks actually disappeared! It was still slightly uneven so I did apply a second coat.

It dried super glossy so I didn't need a topcoat.

Next is Disco Dress from Color Club.

This is a very saturated, bright, deep purple.

The formula was a little on the thick side and I needed 2 coats for full opacity.

The first coat was very opaque, but I had some spots that weren't quite covered.

This dried matte so I did apply a topcoat for the swatch.

The last colour is the very famous Flip Flop Fantasy by China Glaze.

This is impossible to photograph so please don't take this swatch to be true to colour.

This is definitely a neon. It's a very orange with a hint of pink.

This is famous for a few reasons. Firstly because it's an absolutely stunning neon. Secondly because the formula has changed and everyone is obsessed with getting both formula. Thirdly because it has the most difficult formula in the world. I might be over exaggerating a little, but it does have a difficult formula.

I used 3 coats for the swatch. The first coat was very streak and uneven. This polish also doesn't self level meaning you don't have a smooth finish on your nail. I applied a thicker second coat, but it was still quite streaky. I used 3 coats for the swatch, but it still wasn't perfect. I would recommend using this over a white base.

It dries matte so I did apply a topcoat for the swatch.

I am definitely a fan of Meebox.

I think it's a great colour selection and the three polishes included come from very popular brands. The nail vinyl from What's Up Nail Store is also a great addition to this box. I also love the fact they added swatch sticks to the box, this way you can try out the polishes even if you've just painted your nails. It's also great if this is your way of organising your stash. I haven't tried the cuticle oil yet, but I'm seriously in love with the smell, it reminds of of almond spicy biscuits I used to eat in Holland <3

And now moving on to the nail art!

I won't go into detail because I have a whole tutorial of these featured in my review video!

I used all three polishes from the box for the gradient and I used the stencil from What's Up Nails. I also used by Barry M Nail Art Pen to draw the ground for the palm trees.


What do you think of the first Meebox? Will you be getting the next one? I can't wait to hear the theme!!

Check out Meebox on Facebook and Instagram for more details!

Meebox Website!

Monday, 13 July 2015

Mani Swap with @PolishIsTheNewBlack

About a week ago Rachel from @PolishIsTheNewBlack asked if anyone wanted to do a maniswap/bestie twin nails with her. I seriously love her account. She's a fellow UK nail girl who does incredible nail art. It was so difficult for me to choose which design to do, but I ended up choosing this floral design. It's something completely different from anything I've done before.

She decided to recreate my glittery mermaid scale mani (which I'll blog about in a later post... mu blog is a little behind!).

I love how hers turned out, and do you see those cute little seashell studs?!?

Luckily for me, Rachel had a tutorial of her mani on her page ;)


I started off with a pink base of OPI Pink Friday. I love this pink because it's a light pastel shade, but still very very bright.

I then added some green grassy bits. I found out that I don't have a proper grass green in my collection..... I guess I'll have to go shopping!

Instead I used China Grass Grass Is Lime Greener. It's hard to see in the photos since it's so light, but it was more visible in real life.

Following Rachel's tutorial I then added the flowers.

For this I used one of my top 10 nail polishes. This is Mecca Cosmetica Timandra. Mecca Cosmetica is an Australian brand that creates Artistry Nail Polishes, amongst many other beauty items. I miss that store!

Anyway, back to the design.. I drew the flowers and then I used OPI Pink Friday again to colour them in.

Next up is the blue-y bits. I first added some tiny dark blue dots using Mecca Cosmetica Cobalt, and then went over it with Kester Black Forget Me Not.

I finished it off with a red Mecca Cosmetica (I forgot the name) and added some dots in the middle of the flowers.

I'm obviously very technical with all my terms.

I gave it some time to completely dry and I added a glossy topcoat. I then added some star studs on my index and pinky fingers as I didn't have the same shape she used.

How cute are these nails though?!?


Check out @PolishIsTheNewBlack on instagram for more beautiful nail art!

Wednesday, 24 June 2015

Neon Gradient with Nail Mail Stencils

I am a huge fan of creating gradients. I think it's the easiest nail art to create and it always looks so impressive!!

To make it even more impressive I used nail stencils from Nail Mail. Nail Mail is a UK nail stencils company to help you create difficult designs with an easy stencil!

For this design I used the Moroccan Vintage design.


To find out how I've created this design keep reading! 

Thursday, 21 May 2015

OPI Neutrals Swatches & Nail Art

I am trying to get all of my nail polishes swatched. I don't have an 'untried' pile as I've tried probably 98% of all my nail polishes, but I probably haven't swatched 50% of them. I use a lot of polishes for nail art, and some colours I buy exclusively for nail art.

Since my collection is quickly expanding, I thought it was time to destash. I easily got rid of about 30 polishes, including 10 OPI's and 8 Essie's. Now it's time to swatch the rest and see which ones I really like and actually use.

I have already gone through all my Kester Blacks... I'm keeping them all! And my second favourite brand is OPI.

OPI has a fantastic range of nail polishes and constantly have new collections coming out. It's very tempting to buy all the nail polishes that come out, but they also release a lot of dupes (within their own brand) so realistically, I don't need them all...

I decided to start with my neutrals. I'm obsessed with nude nails and I have quite a large range from OPI. I wanted to try something new. Instead of just swatching the polishes I wanted to add some nail art.

I'll start off with the pinky shades. First up is Tickle My France-y.

This is a very pink toned neutral mauve.

I bought this because I saw so many beautiful swatches of it online, but I'm not sure if this really suits me.

I've put it in the maybe pile.

More info, swatches and nail art after the jump!


Monday, 20 April 2015

China Glaze Road Trip Collection Swatches & Review

I picked up 3 nail polishes from the Spring China Glaze Road Trip collection.

The collection consists of 12 polishes. I've heard some mixed reviews about the collection and wasn't planning on buying any, but these were too gorgeous to miss out on!


First up is Dashboard Dreamer.

I am in LOVE! I am obsessed with baby blues anyway, but not only is this a stunning pale baby blue, it has very delicate pink shimmer.

It's very difficult to photograph and it is more apparent in real life than in the photos but a very subtle effect.

Lot's of people have said it before, but it's such a cinderella shade!

I used 3 coats for the swatch.

I have read a lot of bad reviews about this formula and was a little worried to try it, but with 3 careful coats it was totally fine.

The second colour is Wanderlust.

I love that name.

This is another stunning pale lavender shade. It leans more purple than pink, but I don't think it's a full on purple.

It again has that gorgeous pink shimmer running throughout.

I used 3 coats for the swatch.

It has the same formula as Dashboard Dreamer where with 3 careful coats you're good to go.

Honestly, the formula wouldn't have made a difference for me, both of these colours are so beautiful I'd use them regardless of how many coats.

The third colour is Boho Blues.

I'm in LOVE with all three of these!!

I'd seen so many beautiful swatches of this colour that I just had to have it.

This is a light periwinkle blue, but it's much more blue toned than You're Such A Budapest by OPI.

I used 2 coats for the swatch.

It's a bit of a crelly formula so a little sheer on the first coat, but fully opaque on 2.

I'm obsessed.


I'm not the biggest fan of China Glaze nail polish. In fact I only owned 5 before I bought these! (Not counting the mini's I just reviewed as I bought them in the same order!). And these were my first non neons! But my collection is slowly growing.

Friday, 10 April 2015

China Glaze Electric Nights Swatch and Review

I purchased the Baby Beats set of the China Glaze Electric Nights collection from Nail Polish Direct. It consists of 6 mini polishes and they are ADORABLE. I also bought one of the 3 glitter toppers called Point Me To The Party.

This collection consists of 12 polishes in total. 9 of them are squishy neon crellies and there are 3 neon matte glitter toppers.


First up is Glow With The Flow. This is a super bright neon hot pink. I used 2 coats on its own, no white base. 

The first coat was quite sheer and I was worried these would all need a white base, but the second coat covered everything up beautifully. 

It dried semi glossy, so I would recommend using a top coat. 

More info and swatches after the jump!

Saturday, 30 August 2014

Claire's Nail Polish Haul

I've been really curious about the Claire's nail polishes recently so bought 2 polishes and one nail art set. I posted this photo on my instagram and asked people which brand they thought it might be. One of the guesses was Orly, but no one expected it to be from Claires!

This holographic glitter beautify is called Magical Unicorn. It's a super gorgeous pale purple ultra beautiful scattered holographic micro glitter polish. I used 4 coats to get it fully opaque, but you can definitely get away with three thicker ones or some extra glitter placement at the tip.

I paired it with Kester Black Lilac and created a quick glitter gradient.


The second nail polish I bought is White Neon. It's a pastel neon, which are totally on trend this summer.

The formula on this was amazing. I used three coats to get it fully opaque. It was really easy to apply and I had no trouble with bald spots.

This is what I was hoping Grass Is Lime Greener from China Glaze would be like. The formula on that is pretty horrendous, streaky, bald patches, dries too quick and matte finish. White Neon is smooth and super glossy. Although the colours aren't identical (Grass Is Lime Greener is slightly more warm toned) I'd pick this over China Glaze any day!

The nail art set I bought are these neon studs. They come in this little wheel and have round and square studs in blue, orange, green, pink, yellow and purple.

The colours are really bright and will add a cool pop of colour to any manicure. I decided to apply the studs to a plain white base and paint my middle and ring finger with Peonies and Park Avenue by China Glaze.


What do you think about these items from Claires? Will you be stopping by and checking out their nail polishes?

xx Elaine

Wednesday, 20 August 2014

China Glaze At Vase Value

I have slowly started to get more and more into China Glaze nail polishes - particularly the neons! China Glaze nail polish formulas aren't the best out there, so I have never really been too interested int hem... until the new City Flourish collection came out! I already reviewed and swatched Petal To The Metal, Grass Is Lime Greener and Peonies And Park Avenue. Today I have At Vase Value to swatch.

When I saw swatches of this nail polish online I thought it was a gorgeous bright pastel blue, however it's actually much more minty than I expected. I'm in love with both pastel blues and mints so either way I knew I'd love it.

Although it's minty, and I have 1000 mints, this is very different to any of the other ones as it's much more bright.

The formula is ok, it's not the easiest to work with and was quite streaky. I used three coats to get it even. The colour is definitely worth it though.

I decided to give leopard nails a go. I'm pretty rubbish at leopard print and always stay away from them!

The neutral shade is OPI You're So Vain-illa, from the recent Coca Cola collection. The black lines are by the Barry M nail art pen.

What do you think of the new City Flourish Collection from China Glaze?
xx Elaine

Monday, 30 June 2014

Nail Art Challenge June - Picnic & Tropical & Summer

During the month of June I decided to take part in two nail art challenges. To view my other posts click here! Taking on two challenges might have been a bit too hopeful, because I'm drastically behind! As you can tell I'm trying my best to try and get them all done.... today...... So I'm a little more up to date with the challenges on Instagram, but like I mentioned in my previous post: It's about the nail art, who cares if it's a little late.. right?!

Today I am combining three different themes: Picnic and Tropical from #nailartjun and Summer from #nailartchallengejune. At the start of the month I was looking through all the themes and immediately wanted to recreate this manicure by @littletipoff and @sprangleynails on Instagram. I have seen this design floating around instagram and pinterest for a while, but I mainly looked at these two ladies.

It's a Sex and the City style picnic with tropical cocktails and how could this not resemble summer?! I have recently started rewatching Sex and the City from the start... again... and I love it! This is probably the only show I can watch and rewatch and rewatch. I used a ton of nail polishes. Each cocktail is made out of two colours.

I started off with a white base, of course OPI Alpine Snow. I used Furless Cosmetics Clouded and the bottom of the two brushes to draw the cocktail glasses. I love that grey and for a full review click here! I then used China Glaze Grass Is Lime Greener and Essie First Timer and slightly mixed them together using the thicker brush on the top. For the second cocktail I used Cotton On Body Candy Floss and Essie Camera. I love the Cotton On Body nail polish, it only cost $2.95 and it extremely opaque and neon. Camera by Essie is also a neon but requires a white base as it's a jelly formula. For the third cocktail I used Kester Black Blueberry Tart and Now, part of the Architecture in Helsinki limited edition due. And finally for the last cocktail I used Kester Black Peach Melba and Models Own Beach Bag.

I used Black Satin by Ulta3 for the straws and Mecca Cosmetica Ophelia for the cherries. Lastly I used Barry M Diamond Glitter for the glitter ice cubes. That's a lot!! Each cocktail had a bright pastel and a neon so the colours really popped.

I think these nails look really cute, what do you think?
xx Elaine

Thursday, 5 June 2014

Nail Art Challenge June - Sky & Matte

Since I have a bit more free time this month, I decided to take part in a monthly nail art challenge on Instagram. Californails has been making nail art challenges since I've been on Instagram so I decided to do her June challenge! I'm also taking part in a second one created by a friend of mine on Instagram, Glamournailart. Click the photos to enlarge!

The first theme for #nailartjun (by californails) was the sky. I decided I wanted to recreate a photo I took in Byron Bay in Australia. Byron Bay was my favourite place from our travels in Australia and we saw the most incredible sunset. I wanted to watermarble using neon shades inspired by the sunset.

I really wanted to use this new colour by Sally Hansen called Pretty in Hot Pink. I bought it from Fragrance Direct for £1.15. It was a limited addition shade last year and I found it thanks to Nicole from Youngwildandpolished. This photo is just a quick one from my phone, but I will have a Fragrance Direct haul up soon!


Anyway the theme was the sky and I created this water marble inspired by the photo above. I was actually really happy with how it turned out and was scared to draw on it! I used Sally Hansen Pretty in Hot Pink, China Glaze Sun Worshipper and Kester Black Paradise Punch.

I'm really happy with the final result. I didn't want to make the trees too large and be too overpowering. The mountains in the background were beautiful in real life and I wanted to add them to my nails, without them looking to overpowering either.

The theme for the first #nailartchallengejune was matte, and these themes fit together perfectly. I prefer the look of watermarble when it's matte anyway!