Saturday 26 July 2014

Hema Kingston Haul & Swatches

Hema is a very popular department store that sells absolutely anything, and they have recently come to the UK! They have opened three stores, one in Victoria Station, a second in Kingston and the third in Bromley. I have a previous post on the Hema in Victoria Station. I bought my first Hema Holographic polishes there and fell in love. So when the new Kingston Store opened (much closer!) I went back and grabbed the other 3 holos and couldn't resist this gorgeous blue.


First up is number 53 Holographic Blue. I have wanted a blue holographic polish for months but just never ended up buying it. Now I finally have one and it's amazing!! The top right photo is taken in the shade and the other three are in the sun.

The application of this was a little tricky and I used three coats. If you're more patient you can definitely only do two, but just make sure the previous coat is 100% dry or else it will drag the polish.

It's so holographic, it's amazing! In the shade it's a beautiful shimmery blue polish, and once it hits the sun it's a rainbow of different colours.

The second nail polish is 55 Holographic Purple. This one is the least holographic as you can tell by the swatches. Again the top right photo is in the shade and the other are in the sun.

I used two coats for full opacity and didn't have any problems with the polish dragging.

The holographic effect was barely there in real life and therefore very difficult to photograph. In the bottom right shot you can see there is a bit of holo but not as much as the other colours. It's still a beautiful purple shimmer polish though and it looks great on its own as well as with nail art.

The third and final holographic polish is 56 Holographic Bordeaux. This wasn't quite as intense as the blue holo, but still clearly had that holo effect. Again, the top right photo is in the shade and the others are in the sun. I was very surprised at how much I loved this colour, it's a very elegant fall shade.

I used two easy coats for the swatch.

I really like the amount of holo in this polish, I feel it's a little bit more of a sophisticated polish with just the right amount of sparkle - without going over the top!

The final colour is number 836. This is a a slightly green based dark blue. I immediately fell in love with the colour in the store, but once I got home it swatched quite differently from the bottle colour. The first coat is VERY green blue, nothing like the bottle, but the second coat added a bit more opacity and brought it back to the bottle colour.

It's more of a jelly formula, but at the same time very opaque and smooth. I used 2 coats for the swatch.


Have you visited any of the Hema stores in London?
xx Elaine

Friday 25 July 2014

Yoomoo Frozen Yogurt Competition

A few weeks ago the frozen yogurt brand YooMoo had a competition to create nail art inspired by their brand. The prize was a Nails Inc Nail Polish. There were two competitions, one by YooMoo itself and one by @thepolishlist on Instagram. I entered into the second competition and created this nail art inspired by their strawberry swirl flavour.

I watched YoungWildAndPolished's YouTube video on how to water marble. She had so many great tips and advice and thanks to her I am finally able to water marble properly!

For the water marble I used three Essie colours: Urban Jungle, Cute As A Button, and Go Ginza. For the Ombre I used Essie Urban Jungle, Leighton Denny Babydoll, Essie Cute As A Button and OPI Koala Bear-y For the Yoomoo logo I used Urban Jungle by Essie as the background and Leighton Denny Babydoll for the cow.

I am so excited... I WON! @thepolishlist chose my entry as well as @firefly5 and @lisas_nails1 to win an exclusive YooMoo Nails Inc nail polish.

The polish is called Udderly Shocking Pink, and it's this beautiful bright pink. I love Nails Inc polishes are they're always super easy to apply.

I used two easy coats for the swatch and it dried with an incredible shine.

I'm so happy and proud of myself that I won a competition!

Birthday Swatches (Revlon, Sleek, Models Own)

My 22nd birthday was on the 21st of July and I received 4 beautiful nail polishes including 2 Revlon Parfumerie Scented nail polishes, 1 Models Own Hypergel and a Sleek nail polish. All of them are completely new to me so I was very excited to try them out.

First up is Lavender Soap, part of the Revlon Parfumerie line. I have been wanting to try some of these polishes since I lived in Australia, but they were $20 each, which was a little bit pricey for me...

Lavender Soap is a very pale pearly lavender shade, I'm usually not a huge fan of pearl finishes, but this was surprised me! It looks very elegant and so shiny and just like a pearl haha. In direct sunlight you can see the lines of the brush strokes, but in the shade it looks glowing.

The formula is a little sheer and liquidy so it was a tricky to work with. I applied three careful coats for full opacity.

The smell is really nice and fresh and soapy!


The second Revlon Parfumerie polish is Lime Basil. This is a gorgeous medium jade green - I had a hard time describing this colour. It isn't too bright so it's a great colour for everyday wear. I think it'll also be great for nail art.

I used three coat for full opacity, although you could get away with 2 careful coats. The only thing I have to say application wise is that you have to be careful not to brush over the same place twice as it'll pull the nail polish and create a bald spot.

I was expecting a lime or a basil kind of smell, but I found this also smelled very soapy... It's still a nice, fresh smell, but I'm not sure whether it's supposed to smell of lime/basil or whether all the nail polishes have the same smell and the names just refer to the colour?


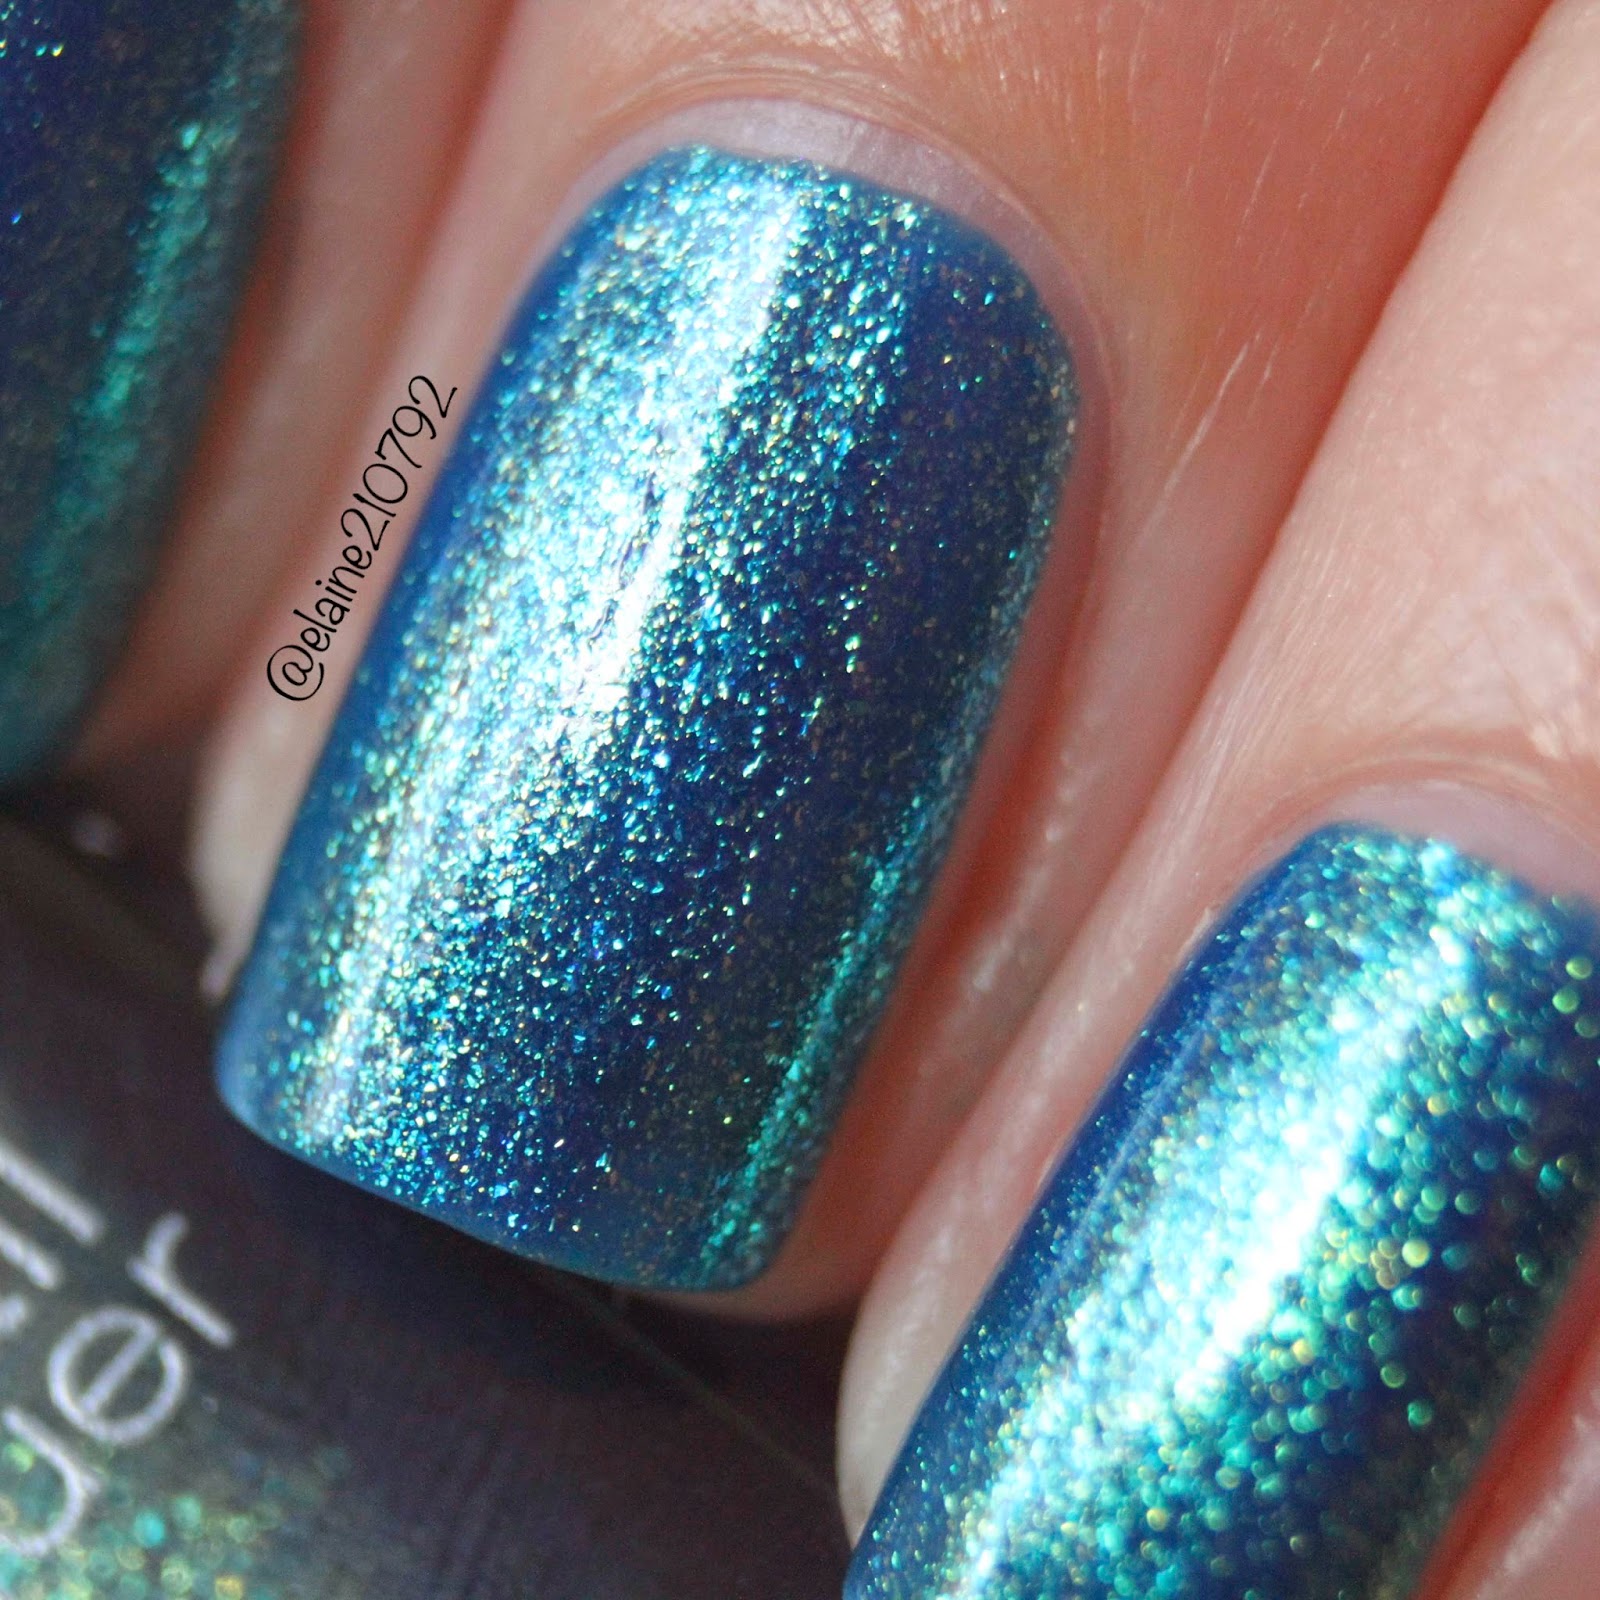
The third nail polish is Blue Glint by Models Own. It's one of their new Hypergel finishes, meaning it's glossy and long wearing like a gel polish, without the UV lights! I really like these kind of gel polishes and they seem to be getting very popular amongst other brands too.

The formula is a little thicker than other polishes, but it's also very very opaque. I used two coats for the swatch. It dries super glossy and looks incredibly! I wasn't sure whether the polish had dried already haha

It's a really bright cyan blue and great for the summer.


The final nail polish is Sleek nail polish in Waikiki 008. I have never tried anything from Sleek before but have seen their nail polishes and have been very curious about them.

This is another gel finish, similar to the Models Own Hypergel, where you don't need a UV light. The bottles are really cute, similar to the Butter London polishes, but these have a twist top, not a pull top.

I used three thin coats for the swatch, but I think you could easily get away with two thicker coats. It started off slightly streaky but the third coat finished it off beautifully. I loved the formula, although it was a bit streaky, it was super easy to apply. It has a thick flat brush so that made application easy too.

I am in love with the colour and it's perfect for the spring and summer. I think it really matches my skin tone. I literally have nothing bad to say about this nail polish!


Thursday 24 July 2014

China Glaze City Flourish Collection Swatches

When the China Glaze Spring 2014 City Flourish collection was released I NEEDED every colour. I held off buying them for a long time and ended up only buying three of them (a 4th is on the way though..). I purchased Petal to the Metal, Grass is Lime Greener and Peonies and Park Avenue.

The formula on these isn't so great, I have read a lot of review about them so I kind of knew what to expect...


First up is Petal to the Metal. This is three coats and no top coat. The formula was a little streaky, but if you're careful it isn't too bad. I found that you can't really brush over the same place twice or else you will get bald spots.

This is a gorgeous colour and I instantly put this on my toes. The camera couldn't quite pick up the neon effect, it's definitely brighter in real life!

All these colours dry to a matte finish, but of course you can easily add a topcoat to get a beautiful shine.


The second colour is Grass Is Lime Greener. I am so in love with this colour!! It's a super bright pastel green.

I applied three coats for the swatch, but it could have probably done with a fourth coat, it's still a little uneven, but looked good enough for the photos!

Although it's a pain to have to do 4 coats of a polish, with neons I don't mind as much because they dry so quickly, it doesn't take long. Obviously I still prefer one coaters...

This colour is so unique though and I don't own anything close to it. That being said I think it's also a very wearable colour for the summer, it's bright and in your face and a different twist on ordinary neons.


The third colour is Peonies and Park Ave. This is probably the least unique colour in the collection, it's a bright hot pink. That being said, this is brighter and more neon than any other hot pink I own and that's the reason I bought it.

I applied three coats for the swatch, but this one definitely had the easiest formula.


I also ordered At Vase Value online so I'll receive that over the next couple of days.

What do you think of the City Flourish collection?
xx Elaine

Essie Urban Jungle Swatch & Comparison

I recently caved and bought Urban Jungle by Essie from the Haute in the Heat collection this summer. I think it's such a beautiful colour but I have so many slightly pink toned off whites.... Well.. I bought it anyway. And look at how beautiful it is!!

It's the perfect pink toned off white shade with an incredible formula. I bought mine from Superdrug, and it came with the wide brush which I much prefer over the skinny brushes. The wide brush made it super easy to apply and cover my nail in one brush stroke. The formula wasn't patchy or streaky and I only needed two coats for the swatch.

Looooook it's so pretty.


I decided to do a quick comparison of Urban Jungle. I used Essie Neo Whimsical, a darker purple toned colour, OPI Don't Bossa Nova Me Around, a more nude toned polish and OPI Steady As She Rose, a much darker pink toned colour. The other three colours are very similar to one another, but nothing is quite a light as Urban Jungle.

What do you think of Essie Urban Jungle?
xx Elaine

Wednesday 23 July 2014

OPI Alpine Snow

I'm always going on and on about how much I love OPI Alpine Snow, so I thought I'd dedicate an entire post to this beautiful white nail polish.

White polishes tend to be very difficult to work with. They're always streaky and need three coats to get opaque and streak free and it's generally just a hassle.... Alpine Snow by OPI is exactly the opposite. I used to have the same amount of trouble with Alpine Snow as any other white polish, but over time (and after having used half the bottle) I feel like I finally have the hang of how it works. Now I can usually just get away with one coat.

I think the bottle being old and used had made the polish a bit thicker, so I use a bit of a thicker coat than normal and slowly brush it onto my nail, trying to cover as much of my nail as possible. The wide brush is great because it does actually cover most of my nail. That's all I do, in one stroke apply it to my nail. If I try and brush over something a second time it drags the polish and becomes patchy and streaky, so literally just one drag! Usually that'll create a very even and easy finish, but if I have missed out the edges or if it is still streaky I add a second coat. Again, I use a slightly thicker coat than normal and slowly brush it onto my nail, trying not to go over the same place twice.


I love just plain white nails, they looks so crisp and clean. What do you think of white polish? Do you wear it often or just under nail art?
xx Elaine

Pastel Ombre & Stamping

Ombre/Gradients are probably my favourite style of nail art, it's so easy to do and always looks so beautiful, no matter what colours you use. For a while now I've been wanting to create a pastel gradient and here it is!

I used from the cuticle to the tip: Kester Black Bubblegum, Sambora Baby Wave, Canmake in purple, Models Own Strawberry Tart and Models Own Peach Melba. It smells amazing, and I love the way it turned out! The colours are so beautiful together.

Canmake is a brand of nail polishes that I bought while I was in Japan, the nail polishes are very cheap, around 300 Yen, which at the time was about $3 (AU) and that converted to about £1.70 at the time. They're great quality and are opaque in 2-3 coats.

Like I mentioned before, I thing gradients are super easy to do, all you need is a cosmetic sponge and your nail polish! I start off with a white base.. OPI Alpine Snow. I use super cheap primark sponges, I think it's £1.50 for 20 sponges? I find these work much better than the more expensive ones from Boots of Superdrug.

I then draw a thin line of each colour onto the sponge, I don't use a lot of nail polish. It looks better when you apply a small amount and use 3 "coats" rather than overflowing the sponge with polish and applying 1 "coat". The more "coats" you apply the more intense the colour becomes, I usually only apply 2 as I like the pale pastel look.

I dab the colours onto my nail moving up and down slightly to mix the colours.  And when I'm happy with the intensity of the colours, I just need to do a lot of clean up.... The photo to the left is just a quick snap from my phone.

After creating the gradient I really wanted to try out my new stamping plate, the Cheeky Jumbo Plate 9 Wild At Heart. I'm pretty miserable at stamping, but with the help of some of my Instagram friends I managed to get 2 of the 4 images almost perfect!


This is probably the cutest stamping plate in the whole world. It has two sections, small animal stamps at the top, and large full nail stamps which I haven't quite mastered yet!

Do you own any of the Cheeky Plates?
xx Elaine

Tuesday 22 July 2014

Abstract Nail Art


I decided to set my own challenge this month: go through all my nail art screenshots on my phone and recreate them. I recreated two abstract designs by @trendypolish, I love all her designs but these two really stood out to me.

One of the things I love about @trendypolish is that she does amazing nail art but it's all very simple and easy to recreate.

This first one is a very simple abstract zigzag design. I used Alpine Snow as a white base for the two accent nails, and H&M Serenity Now for the blue. I love that polish, it's a gorgeous royal blue jelly that's opaque in 3 coats. It's also super glossy. I used my Barry M nail art pen in black to draw the zigzags. So cute!


The second design is very similar. I used Kester Black Tutti Frutti for the purple, it's an amazing formula and opaque in 2 coats. I used Alpine Snow by OPI for the white and my Barry M nail art pen for the zigzags.

I really like the nail art pen, but I'd love to have one with an even thinner tip. If I want thinner lines I usually just end up using a nail art brush, but the pen is so convenient and easy to use.


What do you think of these designs? Check out @trendypolish on Instagram for more great ideas!

xx Elaine

Wednesday 9 July 2014

Nautical Nails

Last month I decided to take part in two monthly nail art challenges and it was a bit much and unfortunately, although I did my best, I couldn't finish them. This month I decided to do things a little differently and instead of doing an official monthly challenge I'm doing my own!

I have about 3459837 screenshot on my phone of different nail art I have wanted to do, but for some reason never had the chance to do them! I'm going to go through all the nail art screen shots and recreate them.


These gorgeous nautical nail are inspired by @annkristin0 on instagram, she's one of my favourite instagrammers, she's so sweet and even though she has 11K followers still takes the time to comment on other peoples photos and reply to questions. Her nail art is absolutely beautiful and I love all her comparison posts. If you're not following her I definitely recommend checking her out!

Anyway, she created these nails quite a while ago and I fell in love with them. It's a whole different take on traditional nautical nails.

I used Essie Urban Jungle and Penny Talk as well as Kester Black NOW and Cotton On Body Candy Floss. I used a dotting tool for my index finger and the circle of the anchor as well as nail striping tape for my middle finger and pinky and a small nail art brush for the anchor.

It's my first time drawing an anchor so it was a bit tricky, but I'm really happy with the outcome.

What do you think of these nails? Is my recreation close to the original?

xx Elaine

Tuesday 8 July 2014

Kiko 530

Last month I went to Westfield in Stratford and bought a whole bunch of polishes, including this BEAUTIFUL Kiko nail polish 530. Kiko isn't a brand I'm too familiar with, but I do know they have a lot of nail polishes and are very cheap. That's the only thing that's important right?!

Anyway while browsing through the tiny shop, this nail polish caught my eye and I couldn't resist. I had to get it. I believe it was only £2.90. I swatched it on a nail art wheel as soon as I got home and haven't really touched it since.... It's just been standing on top of my nail polish drawer (alex from ikea) looking pretty.

Be prepared... there are a lot of photos!

Sunlight 


Kiko nail polishes don't have names, just numbers and this is number 530. It's a blue jelly polish packed with flakie shimmery golden glitters. The photos make it look more blue but in real life it's much more green, like the bottom right photo in the set of photos above.

Sunlight
I've taken a billion different photos, in the sun, blurry, in the shade, different hand positions, macro, not macro etc. I couldn't stop.

Look at those sparkles!!
Sunlight


From different angles the polish looks different. In the shade the golden specks come out more and in the sun it goes radiates. The photo to the right shows how blue it can look.

shade
The formula was amazing. even though it's a jelly base, it's very opaque and I only needed two coats. There isn't any fishing either, its so packed full of flakie glitters you don't need to worry about that!


The photo to the left is taken in the shade with a macro lens, you can really see the golden flakie glitters. and that they reflect green.

Sunlight


Blurring the photos really show the sparkle. It's incredible!

Sunlight 


I could continue taking photos forever, it's just so beautiful! And the best thing is, is that I used my peel off base coat so I didn't have to worry about taking it off before work!

Sunlight


Last one.. I promise.

What do you think of this colour? Have you tried any Kiko polishes before?

xx Elaine