Showing posts with label press sample. Show all posts

Tuesday, 2 February 2016

'Ard As Nails Tindledale Collection Review

Hi everyone!
It's been a while since I've last blogged. My YouTube channel kind of took over and my blog got left behind... but iMovie isn't working and I really wanted to get a review up so what better way to get back into blogging!

Today I have three stunning 'Ard As Nails polishes to show you. 'Ard As Nails is a relatively new UK 5 free indie brand. They are created by the owner of Soap Dodger, and I'm so happy she decided to brand out into nail polish. This has quickly become one of my favourite new indie brands! They have some of the best creme polishes ever, as well as some gorgeous holos and colour shifting polishes.

The three polishes I have to show you today are from the Tindledale collection. The first polish is a stunning raspberry scattered holographic polish called Plum Crumble At Kitty's Cafe.

For the swatch I used 2 coats plus topcoat. It was almost fully opaque in just 1 coat, and if you're in a rush you can definitely get away with just 1 coat, but the second coat slightly deepened up the colour and completely covered my nail line.

It dries a little dull, like most holos do, so I did apply a topcoat to make it nice and glossy.

The formula was incredibly easy to work with. For being such an opaque polish, the formula was very smooth and just the right consistency.


The second polish is this silver linear holographic called Twinkling Night Over The Village Green.

This is a slightly more charcoal silver than most other silver holos, which is a nice change in my collection.

The linear holo isn't quite as strong as others in dull lighting, but as soon as the sun (or my phone's torch..) hits it it comes alive.

For the swatch I used 3 coats. It was a little on the thin side as was a little sheer. It built up really nicely though and the coats dried very quickly.

It was fully opaque in 3 coats. Again I used a topcoat for the swatch photos as holos do tend to dry a little dull.

I was amazed by how beautiful this is at its full potential. STUNNING!


The last polish is Honeysuckle Bliss in the Lane. This is a yellowy golden flakie polish.

This really reminds me of OPI Goldeneye, but this is slightly more yellow toned. It's the same concept though.

I used 3 coats for full opacity, although this is a polish that could also be sponged on for full opacity.

The coats dried very quickly so it wasn't an issue having to apply 3 coats. It's a very dense flakie so although you could use it as a topper, I would recommend wearing it on its own.

This was so stunning in real life, it's so reflective and just shines off your nails, which is definitely something I need with this depressing grey weather in the UK! It's like sunshine on your nails!

Those are the 3 'Ard As Nails polishes I have to show you. I am in love with them, like ALL the other 'Ard As Nails polishes I own!

As soon as iMovie decides to start working again I'll upload the video and link it here, but this blog post will have to do for now!

Let me know which one of these polishes is your favourite! Have you tried 'Ard As Nails?

xx Elaine

Sunday, 27 September 2015

Mermaid Nail Art Born Pretty Store Review - Monthly Challenge

Today I have another nail art design to show you from #clairestelle8sept monthly challenge!

This month I'm taking part in a nail art challenge where every couple of days there is a different theme. To make it even crazier, I decided to do bestie twin nails for every theme!

The theme for the 12th of September was Mermaid and I collaborated with Bethany from @bnailedtoperfection. We decided on doing the mermaid design on the middle and ring fingers and using shell studs on the pinky and index finger. And our general theme was blue.

I loved how both of ours turned out!

I didn't create a tutorial on these, however I have something very similar on my channel already here!

Check out all my other designs for this challenge here!


I started off by painting my outer 2 fingers black and my middle 2 fingers white.

I applied a fast drying topcoat to my middle and ring finger and waited for a good 10 min before doing anything else.

I applied some liquid latex around my nails (Charming Tale Practical Magic) and once that was dry I placed the mermaid scale stencil onto my nails.

I first sponged black polish over the stencil. The black base will really make the shimmery polishes pop.

I used a cheap Primark cosmetics sponge and applied Charming Tale The Huntsman and Frightfully Spectacular Orinoco Flow in random positions on the sponge.

I then dabbed it onto my nail, like any other gradient.

I applied 2 "coats".

When the nail polish was still wet, I gently pulled the stencil off, the liquid latex barrier will peel off at the same time.


For the studs I used this set up studs from Born Pretty Store (#20312). This comes in a case and has all sorts of different studs including stars, hearts, seashells, pointed studs, square studs and much more! Most things come in both silver and gold!

I love that it comes in a little box instead of little plastic bags. It's incredibly easy to keep organised this way!

I used the silver seashell studs. They're super cute and worked perfectly with the mermaid scale design.

I applied a dot of topcoat onto the base of my index finger and pinky. I can carefully picked up a seashell stud with a pair of tweezers and applied it onto my nail.

That's it! I really like how this design turned out! I love the subtle mixed gradient of the mermaid nails and the studs really help bring the look together.

xx Elaine


Saturday, 26 September 2015

Dark Metal Lacquer Autumn 2015 Swatch & Review

Today I have probably my favourite collection ever to show you. Yes that's a big statement... I feel like I get more and more excited about nail polish. But seriously... just wait. This collection is pretty epic.

I have the Autumn 2015 collection from Dark Metal Lacquer!

I have reviewed for them before and I loved the polishes so when Kam told me she had some more polishes she needed swatched.... I wasn't going to say no!

This collection consists of 6 polishes. Two linear holographics, 1 flakie in a dark brown base and 3 flakies in a clear base. The polishes retail for £6.50 for a 11ml sized bottle. You can also buy the whole set for £36 or just the 3 flakies for £17.50.

As always, I have LIVE SWATCHES of these on my YouTube channel!

First up is Benighted.

This is a deep navy linear holographic polish. It's not too in your face, a little deeper and muted than a traditional navy. It the perfect Autumn shade and I love that it'll be blue no matter what lighting your in.

I used 2 coats for the swatch. It was almost fully opaque in just 1 coat and you could easily get away with just doing the 1. The second coat does deepen up the colour.

The formula is incredibly easy to worth with, very smooth, not streaky, dries quick. Perfect!


Next up is Black Rose Immortal.

This is a dark plum linear holographic polish.

This is quite similar to the previous purple holo that I reviewed, but this is much more muted and has a hint of berry.

I used 2 coats for the swatch.

This had that same amazing formula. It applied really beautifully and smooth and it was almost opaque in just 1 coat. I did apply a second coat to deepen up the colour.


Next up is Harvest.

This is so uniquely beautiful. This is a multicoloured colour shifting flakie in a deep dark brown jelly base. The base is so dark it's almost black.

I used 2 coats for the swatch. It is fully opaque, however I reckon a third coat would really deepen up the base.

It looks like this has the same flakies as the next polish.


Ok.. now get ready for 1048987598 photos. I was kind of in love.

You really want to see all these polishes in action, photos really don't do them justice!!

This is Nectar.

This is the most amazing multicoloured colour shifting flakie I've ever seen!

It goes from this vibrant pink fuchsia to a yellow gold, but there is also green and purple and a hint of blue. Seriously. A-Ma-Zing.

I applied one coat over a deep dark plum creme. The photos below, where it's fully opaque, I sponged the flakies onto my nail - like doing a gradient, but then just flakies.

Just look at the flakie goodness.


Next up is Hope Leaves.

Aarrrgghh This is so amazing too!

This is another flakie that goes from red/fuschia to a yellowy gold.

I used 1 coat over black, but I also sponged it onto my nail.


The last flakie is Patterns In The Ivy.

This isn't quite as colour shifting as the others, but it's still very unique.

When you're looking at it from the front you see green and silvery pink flakies, but as you tilt your hand it turns purple. You'll see the shift best in the video.

I applied 1 coat over a deep navy base.


So that's the Autumn 2015 collection from Dark Metal Lacquer. I obviously love the holos, but the highlight of this collection are the three flakies!

They are such incredibly densely packed that you could probably get them opaque on their own rather than sponging it on.

I love them layered, but just LOOK how gorgeous they are sponged on. Such an incredible effect. My all time favourite is Nectar. I literally couldn't stop taking photos.

These polishes are available right now! So check out Dark Metal Lacquers shop!

xx Elaine

Friday, 25 September 2015

Personail Nail Polish Strips Review

Hi everyone! Today I have a little bit of a different post for you and something I've NEVER done before!

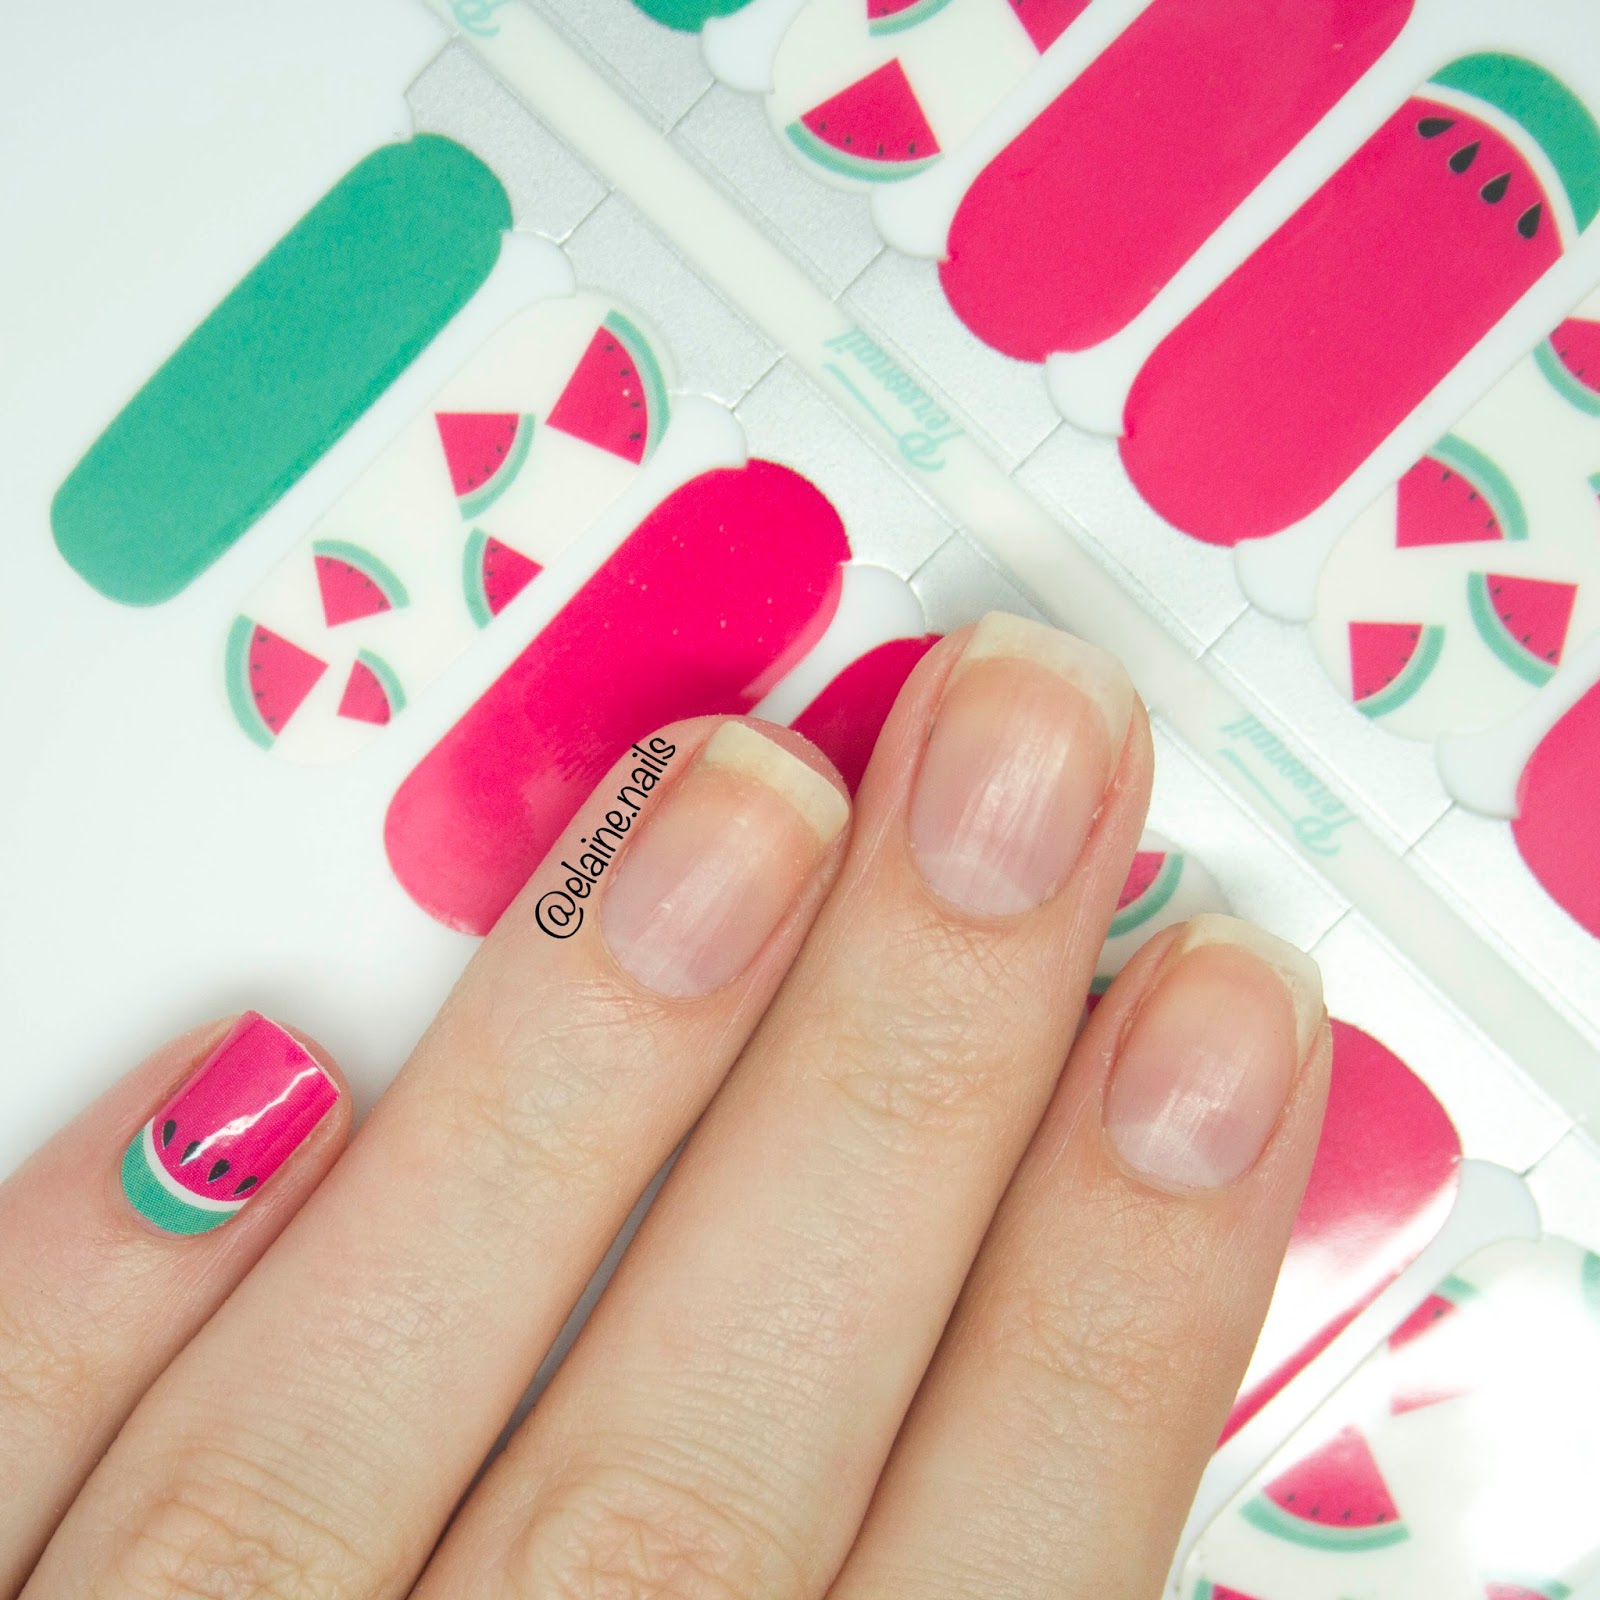
I received some Nail Polish Strips from the brand new Australian based brand Personail. Personail launched their brand on the 23rd of September and they're all about cute nails without hassle and something to fit every occasion.

Their wraps have different "personalities" meaning they have something for everyone. The strips I received are "Charmingly Cute", there is also "Glamour" and "Perfectionist". Charmingly cute has loads of fun, cute, unique and playful prints, Glamour has glitter and metallic designs and Perfectionist has solid colours.

For a brand that has only launched a few days ago, everything looks SUPER professional from the packaging to the website and everything in between.

Before I get started, if you're interested in any of the designs I have a 10% off code for you: EN10


The polish strips cost AU$13 which is roughly £6 (on the 25th of September). Postage to the UK is also very affordable. If you buy 1-2 designs postage is only $3 (£1.38). If you buy 3-4 designs its $6, and shipping is free on orders over $50 (this could be a limited time offer!).

The benefits of adding nail polish strips mean there is zero drying time and no nail polish smell! I paint my nails so often I'm not bothered by the smell anymore, but I always worry about having people come over and as soon as they walk into the house they'll be hit by a cloud of nail polish fumes.

The nail polish strips also last for up to 10 days. I unfortunately wasn't able to test the longevity of the strips because I work as a waitress. I work with a lot of water and I'm constantly polishing cutlery.. nail polish generally lasts through just  one shift. I did actually wear this to work and I didn't have any issues with chipping or anything! Plus everyone commented on how cute my nails were ;).

It has a very professional finish - definitely can't argue that! And lastly they fit all nail types! Each pack comes with 16 polish strips so more than enough to do your nails, make a few mistakes and check which size fits best! The pack also comes with a mini file and a cuticle stick.

Another claim is that they're easy to apply. For someone that's never done anything like this before... yes it was easy! I hadn't done any research on how to apply nail polish strips so it was literally going in blind, just the directions on the back of the packaging.

1. The first step is the check which of the strips fit best for each nail. There are quite a few different sizes so there is literally something for everyone.

Before you start you have to make sure you have clean dry nails. I took off all my nail polish (even base coat).

2. Remove clear protective layer, hold silver panel and peel away from back panel.

Right so you'll be able to see in the video I was a little clueless at this point.

I actually pulled the stencils off from the rest, that way I only have one design in my hand to work with. Much easier.

I then removed both the front and the back. The front is a clear film and the back is paper. Now it's time to apply it to my nails...

3. Position sticker on nail holding the silver tab.

This is pretty straight forward. You aline the sticker with you nails and just stick it on there. At this point it's literally just a sticker.

4. Press firmly to smooth over nail surface. File downwards to remove excess.

So you have to make sure you push the stencil all the way down all along the edges of you nails. You don't want anything sticking up! Once it's all smooth you can start filing.

My nails are pretty short so I actually cut the stencil in half and then started filing. Again, much easier!

It's best to file in a downwards motion. Don't worry you're not actually filing your nails down, you're just filing the sticker. As soon as you see your nail poking through you can stop.

I finished it off with a topcoat so it would last longer

Now the best part... doing my other hand!! It was literally the easiest thing every to my my right hand. I always struggle with nail art and it can take AGES! But since I'd got the hand of these stickers my now it was incredibly easy.

That's it!

How cute do they look?!

I love that it's a different design on every nail. I had the little triangle watermelon design on my thumb as well. This is just the most adorable nail design I've every had on my nails.

I am really impressed with Personail. Don't you just love their brand name?

Although nail polish strips isn't something I'd use all the time, I'm really happy I've tried it. This is great for when you have people coming over, but you still want to have cute nails without have to worry about nail polish smells.

This is also great if you're going on holiday and don't want to bring 100 nail polishes and tools for nail art. Just stick these on and you're good to go!

Another bonus is that if you're not very good at nail art or if you don't have a steady hand this is a great way to be able to have beautiful nails! The fact that they are nail polish strips means that it looks like actual nail polish on your nails, no fake nails, no bumpy thick nails. It just looks like a layer of nail polish.

You can be really creative with these strips. I could have easily used the green sticker and it would look completely different.

The price is amazing! For less than £15 you can have two nail polish strips posted! I highly recommend these.

Remember if you're interested in buying some, don't forget to use my discount code EN10 for 10% off your purchase!

xx Elaine

Thursday, 24 September 2015

CM Handmade UK Halloween 2015 Swatch & Review

Hi everyone! Autumn has officially begun so it's time for all the new (amazing!) Autumn and Halloween collections!! I used to not really participate with seasonal nail polish, but this year I've been obsessed with pastels in the spring, then pastel neons, then full on in your face neons and now it's time for some deeper reds and cobalt blues.


Today I have the Halloween collection from CM Handmade UK! I have reviewed for them a few times before, to check out all my other blog posts click here! CM Handmade UK is a relatively new UK based indie nail polish brand run by 2 sisters. Alongside their nail polishes they also sell crafts, ornaments, wax melts and more. The Halloween collection has to be my favourite collection they've launched. It literally just screams Halloween! It consists of 3 crelly cremes, 1 holo and a glitter topper. They're available to buy in a set for only £10 plus postage!!

As always, I have LIVE SWATCHES of these on my YouTube channel!


First up is Frankenstein.

This is a bright slime green. Maybe I'm thinking slime because it's a halloween collection...

It's incredibly bright!

I used 2 coats for the swatch.

It's a bit more a crelly formula, right in between a creme and a jelly. It applies beautifully. It's not streaky but there is a slight visible nail line so definitely needs second coat. The second coat really brightens up the green.

It dries to a glossy finish, I didn't apply topcoat for the swatch.


Next is Pumpkin.

This is a fiery red orange. It's definitely an orange with a lot of red tones.

This is another crelly polish. It has that gorgeous squishy feel to it.

I applied 2 coats for the swatch.

The first coat is almost fully opaque, literally the best formula ever. There is a slight visible nail line so I did require a second coat.

It dries to a glossy finish.


This is Witches Brew.

This is a very vibrant blue based purple.

It was a little bit more sheer than the previous 2 polishes but built up in 3 coats.

My bottle had a few unresolved pieces of pigment leaving it with a slight gritty finish. This didn't affect how the polish applied but I'd recommend applying a topcoat. It dries to a little bit of a dull finish so I'd recommend adding one anyway!


The glitter topper is called Trick Or Treat and it's adorable!!

I'm definitely not a huge glitter topper fan, and I've always stayed well away from anything skulls but these are just the cutest little holographic glitter skulls!!

This polish has green, purple, black and fiery orange hex glitter - matching all the polishes in this collection. It also has larger orange hexes and holographic skulls.

I had to do a little fishing for the larger glitters, but it wasn't anything more than other glitter toppers.

The great thing about this topper is is that it would look good over any of the polishes in this collection!


The last polish.... is amazing!!!

This is Vampire Bat and it's a black holographic polish.

I have had the biggest holo obsession lately and I  think black holos are my newest obsession.

This has quite a large holo micro glitter.. if that makes sense? It looks like silver glitter in dull lighting, although you can see a hint of rainbow. Once you get in the sun/flash or the right lighting it just blows up!

I'm obsessed.

I used 2 coats for the swatch. It's almost fully opaque in 1 coat, although a second coat really deepens up the colour. It dries to a bit of a dull finish so I would recommend adding a topcoat.


That's it for the CM Handmade UK Halloween 2015 collection! All polishes are available right now! Check out their etsy shop for all their other products!

xx Elaine